Sereja's Animated Hover Tutorial:
How to animate a Hover, adopted for SWBF1.
Well, there is exist a tutorial about that on Gametoast, but it's for an experienced modders:
http://www.gametoast.com/forums/viewtopic.php?p=264078#p264078
In this tutorial, I will also skip many steps, like how to use XSI etc., so I am realy suggest to read my Door making tutorial first:
http://www.swbfgamers.com/index.php?PHPSESSID=1ea17f0502578eeef215ff4e3ff5711f&topic=5433.0
Things need to have:
XSI Mod Tool 7.5
ZETools
Some paint editor, which support TGA format. (I am use Paint Shop Pro 7)
BFBuilder
HEX Editor
MSH_TAG_SIZE_VALIDATION_TOOL
BFViwer
Some free time.
Step. 1.
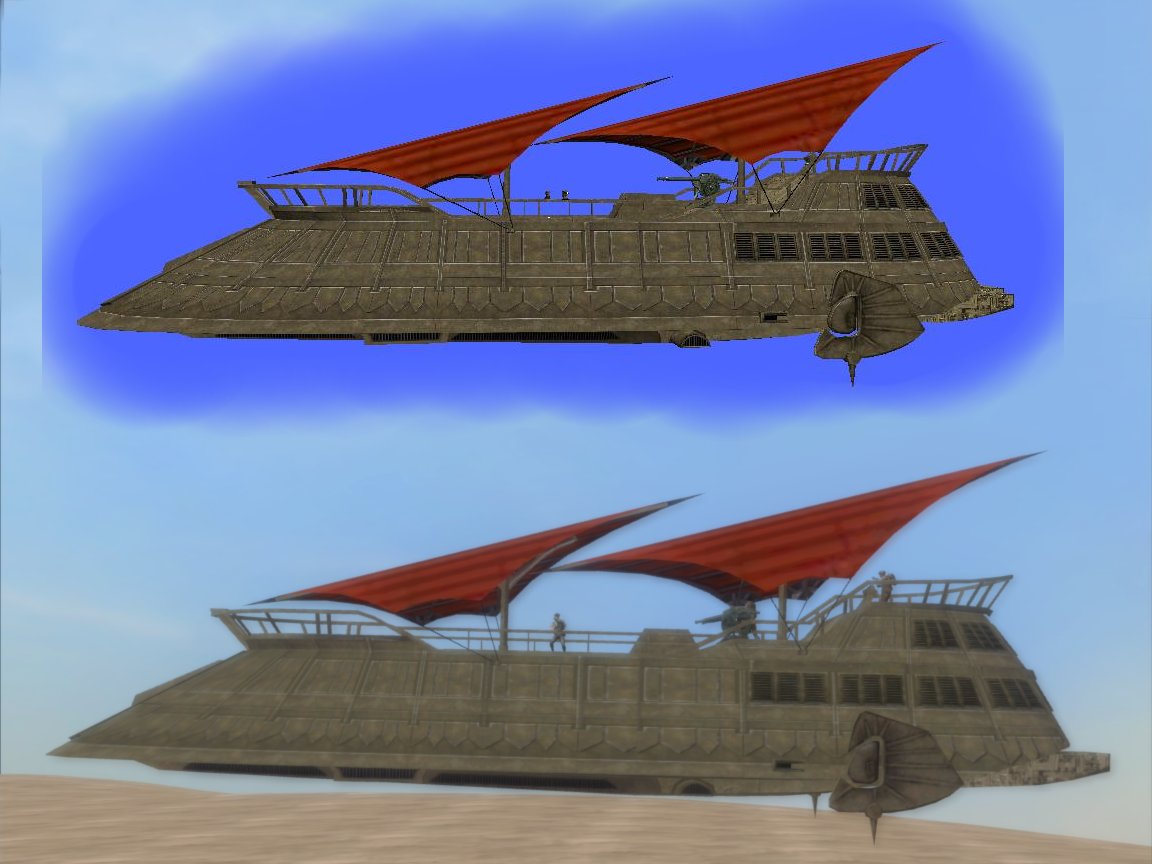
Making a Hover model.
The limit is only your fantasy, but mostly it's shold be a main body part, and some moving parts (fins). So, for example we call it a hover_body, and moving parts: fin_front, fin_back, fin_front_left, fin_front_right, fin_back_left, fin_back_right, fin_left, fin_right (Yes, that's all possible moving directions). Some hovers may have only 1 fin, others may need more then 8.
Step 2.
Hierarchy.
Create a small cube, about Length 0,2 or so. Add any texture to it, I may suggest use stock com_inv_col.tga, by using Unique UV's (polymesh) projection, and named it a Dummyroot. You may hide it later, by clicking "H" button, from keyboard.
Copy this cube, and named it whatever you wish. Here and on, I will call it "a_thing". For better view, you may translate it up a little bit, and freeze it. Put it inside Dummyroot, so a_thing, is now his children.
Create a Null, named bone_root, and put it, inside a_thing.
Next, for each moving parts, you have to create a bone, so create a Nulls, and name them: bone_front, bone_back, bone_front_left, bone_front_right, bone_back_left, bone_back_right, bone_left, bone_right. Put all of this inside bone_root. Well, perhaps it's not enough for you, and you wish to made more moving directions for animated bones and moving parts? Not a problem. For this you just need to made secondary bones for each of normal bones (like bone_back_right_up etc.) and put them inside them as a children. But this time we try to create something very simple right?...
Now, you may put all of your model moving parts ( do not forget to freeze them before), inside almost similar named bones.
Step 3.
Envelope.
In left upper panel, click Animate and now you are should be in green theme. Hold Ctrl button on your keyboard panel, and start clicking on moving model parts: fin_front, fin_back, fin_front_left, fin_front_right, fin_back_left, fin_back_right, fin_left, fin_right and a_thing. Make sure, they are all white, and click next buttons: Envelope>Set Envelope>Yes. Now, your mouse cursor should be changed to "PICK", so now you have to be very careful, and do not click to anythyng if you not sure.
It's time to pick up some bones: click on bone_front, bone_back, bone_front_left, bone_front_right, bone_back_left, bone_back_right, bone_left, bone_right and bone_root. Click right mouse button and close pop up window. If everything done right, you should see a colorful bones and colorful points on moving parts.
Seems they are now animated, but... hold on! XSI is lie to you! In the game, most of animated parts will be messed up. So, you have no any choise and need to reset all of the animations manualy. In right panel, click button, named Point. Crop all of the points on the animated moving part. Make sure those part, should belong only one certain animated bone (have only one color) and click next buttons: Envelope>Reassign Locally. By left mouse button, pick exactly bone, which those model parts should be belong, and click right mouse button. You may not spot any chagings after this, but trust me: they are happens.
Do not forget: a_thing model part, should have a bone_root animation.
Step 4.
Animation.
Set timeline panel from 0 to 8. Click on some bone, which should move (usualy it's only rotation), and click under Transform right panel, some of the rotation directions, which one of you like it move: X, Z, or Y. Now rotate it to the limit you whish, and click to the big key icon button, to create first key frame (red marking). There is should be only 9 keyframes, and each one responsible, for certain direction, in which hover may move in game. I may suggest to not move bones manualy, and just tipe certain number of rotation angle under rotation panels. It makes all other animated parts move simmetricaly and easy to set up. After this, move timeline cursor one step left, by small cube button, with this icon: > and create next keyframe, till you made all 9 of them. The same process, should be done for all animated bones except bone_root.
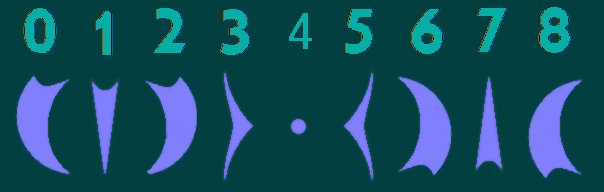
So, for what of the directions responsible all of those keyframes? Let's see:
0 = forward, turning left.
1 = forward.
2 = forward, turning right.
3 = strafe left.
4 = not moving.
5 = strafe right.
6 = backwards, turning left.
7 = backwards.
8 = backwards, turning right.
Perhaps, with my hover direction translate interpritation image, it's could be more understendable:
Step 5.
Overall setup.
There is exist 2 ways to set animated parts, so you have to choose:
1. Separated method.
You may left them as they are, but in this case, you have to add their names to your msh.option file:
-keep fin_front, fin_back, fin_front_left, fin_front_right, fin_back_left, fin_back_right, fin_left, fin_right
2. Merge method
You have to merge all moving parts to single model, by clicking under Create panel:
Poly. Mesh>Merge>Materials, UV's, VertexColors, Weight Maps Merge and Shape Animation, Envelope Weight... Merge.
But, I am afraid, you have to again Reassign Locally all of the colorful points, and sometimes, it's realy bored work.
Non animated body part(s), should be puted under bone_root
Scroling parts (wheels & treads) also can be animated, but they are always should be stay as separated models, named wheel_left and(or) wheel_right, so in msh.option they can be supported by this line:
-keepmaterial wheel_left wheel_right
Important note: if your hover have a turrets, or any moving main guns, make sure, they are not share any textures, with animated hover parts, or your turrets will be just drop down!
Step 6.
Collision.
For non animated part of the hover it's could be enough reducted version of the body, named collision. To make it, just copy or merge not moving body parts, and click under Modify panel: Poly. Mesh>Polygon Reduction>Ratio 50 or 70 (depends of your model limits), and put it under bone_root. Such collision, could be nice for ordance or soldiers, but for building and vehicles, it's too complicated and it's better to use collision primitives anyway. Hide them, by click "H"
Collision Primitives.
As we already know, they shouldnt be freezed or resized by Translation panel (except cubes). Also, because of current issues of the last ZETools version, Length of the cube primitive, should be decreased in twice, before export. So, name them as p_cube1, p_sphere1 etc. and put under any animated bone (if it's needed) for moving parts, and under bone_root for non animated body. Hide them, by click "H"
SpringBody.
This type of collision, may be generated by the game itself, can be sets up by .odf, have no more then 6 spheres, and it's needed mostly for terrain and building collision. This collision can be visible in SPTest, if you choose free camera and render collision mode. In odf, it's usualy look's like this:
1.4 = forvard & backward
1.7 = up & down
2.5 = size
Step 7.
Shadow.
This thing is a mix, between collision and animation making. You have to copy all animated and non animated parts, reduce polygons, and merge them just like any normal animated parts. I may suggest to delete all inputs, when you merge them. Most bored part: you have to Reassign Locally all of the animated points (again). Even parts, that shouldnt be moved have to be animated, and they are belong to the bone_root. Name it sv_hover or sv_somehow, and put it under bone_root. Don't forget to put -shadowOn line in msh.option file. Hide it, by click "H"
Step 8.
Lowrez.
It's realy needed for the long range. Usualy, it's may no need animation at all, so it's just a merged and reduced hover parts, named lowrez. Still the memory of the game, can be overloaded not just by polygons, but also by big tga's. At least all stock vehicles have very small lowrez tga's. How to replace texture names in XSI... I know one way, but it's long and bored (you have to merge models with new textures, and use Material Manager after). Let's make it quick: export your lowrez with ZETools, open it with HEX Editor, and change texture names, by replacing any new letter or adding _lowrez endings, to each tga name. In this case, you have to fix it, with MSH_TAG_SIZE_VALIDATION_TOOL. Import it back, under Modify panel click Poly. Mesh>Weld Boundary Points/Edges>Distance 0,002 (usual action when importing something). Now, put the new lowrez under bone_root. Right mouse button click Properties>Viewing>Visibility and uncheck Render Visibility.
Step 9.
Hardpoints.
Add a Cone, and make for it's Base Radius and Height about 0,02 or so. Name it hp_damage1 etc. and translate it to any possible damage places on your hover, so it's will be the place, where the damage fires starts on. I guess the limits for them is 8 or so. Hide them, by click "H". ODF lines for it looks like this:
[spoiler]
Almost the same for hp_pilot, if you need to see a soldier pilot in your hover, but the odf lines could be next:
Step 10.
Chunks.
If your hover can be destroyed, it's culd be a bad manner for it, to just dissapear. So, do not forget about chunks. Copy all needed animated and non animated parts. For animated parts click Envelope>Remove Envelope. Sometimes, you have to cut body to smaller parts, make insider polygons and add new textures (don't forget to remove old one first). Export them one by one, putting under any new maded Null. You may also add a hardpoint to them, so they may have a smoke trail. In .odf exist alot parametrs for them:
[spoiler]
Step 11.
Material Manage.
Before export, I may suggest to save the Scene, and click on blue Render theme. Select model, under Modify panel click Materials, and use material manager. By using mouse cursor, in the left side of the pop up window, try to replace all similar materials in to the one. It's may decrease size of the model, and makes future hex editing easy. Just be careful, and never mix materials for bump, scroling, specularity etc.
Step 12.
Export.
hover.msh
Make sure your timeline cursor is on the 4. It's neutral position for hover, and it's always should be at 4 as default.
Click on the Dummyroot, and click on it middle mouse button. All hierarchy should be semi transparent white color. Click on ZETools>Export Mesh.>Check Sel (no Bad Faces warnings should be appear, or you have to triangulate your model).
If everything is ok, click ZETools>Export Mesh.>Export. Export Animation and Current frame as Basepose, should be unchecked. No, you got your hover.msh!
all_hover_9pose.msh
Just like it was in the Door tutorial, now, you have to delete all of the model parts, and left only bones. Still, Dummyroot, and a_thing, which realy a models, are stay.
Export it, but this time check Export Animation, but Current frame as Basepose, should be unchecked. Now, you got your "9pose" and have to name it somehow. For example, it's will be all_hover_9pose.msh.
basepose.msh
Export the same, but this time, check Export Animation, and Current frame as Basepose both. You have to name it basepose.msh.
Step 13.
Animation Munge.
It's totaly similar, with the door animation munge, so there no big sense to repeat everything. Just name your folder like all_hover, put in there all_hover_9pose.msh, and basepose.msh, click munge, and get your all_hover.zaabin and all_hover.zafbin.
Step 14.
Odf Set Up.
Odf, it's a realy big story, but this time we set up mostly a hover animation, so let's do it. This lines should be putted in:
Well, I guess that's it! Pretty simple after all isn't it?
How to animate a Hover, adopted for SWBF1.
Well, there is exist a tutorial about that on Gametoast, but it's for an experienced modders:
http://www.gametoast.com/forums/viewtopic.php?p=264078#p264078
In this tutorial, I will also skip many steps, like how to use XSI etc., so I am realy suggest to read my Door making tutorial first:
http://www.swbfgamers.com/index.php?PHPSESSID=1ea17f0502578eeef215ff4e3ff5711f&topic=5433.0
Things need to have:
XSI Mod Tool 7.5
ZETools
Some paint editor, which support TGA format. (I am use Paint Shop Pro 7)
BFBuilder
HEX Editor
MSH_TAG_SIZE_VALIDATION_TOOL
BFViwer
Some free time.
Step. 1.
Making a Hover model.
The limit is only your fantasy, but mostly it's shold be a main body part, and some moving parts (fins). So, for example we call it a hover_body, and moving parts: fin_front, fin_back, fin_front_left, fin_front_right, fin_back_left, fin_back_right, fin_left, fin_right (Yes, that's all possible moving directions). Some hovers may have only 1 fin, others may need more then 8.
Step 2.
Hierarchy.
Create a small cube, about Length 0,2 or so. Add any texture to it, I may suggest use stock com_inv_col.tga, by using Unique UV's (polymesh) projection, and named it a Dummyroot. You may hide it later, by clicking "H" button, from keyboard.
Copy this cube, and named it whatever you wish. Here and on, I will call it "a_thing". For better view, you may translate it up a little bit, and freeze it. Put it inside Dummyroot, so a_thing, is now his children.
Create a Null, named bone_root, and put it, inside a_thing.
Next, for each moving parts, you have to create a bone, so create a Nulls, and name them: bone_front, bone_back, bone_front_left, bone_front_right, bone_back_left, bone_back_right, bone_left, bone_right. Put all of this inside bone_root. Well, perhaps it's not enough for you, and you wish to made more moving directions for animated bones and moving parts? Not a problem. For this you just need to made secondary bones for each of normal bones (like bone_back_right_up etc.) and put them inside them as a children. But this time we try to create something very simple right?...
Now, you may put all of your model moving parts ( do not forget to freeze them before), inside almost similar named bones.
Step 3.
Envelope.
In left upper panel, click Animate and now you are should be in green theme. Hold Ctrl button on your keyboard panel, and start clicking on moving model parts: fin_front, fin_back, fin_front_left, fin_front_right, fin_back_left, fin_back_right, fin_left, fin_right and a_thing. Make sure, they are all white, and click next buttons: Envelope>Set Envelope>Yes. Now, your mouse cursor should be changed to "PICK", so now you have to be very careful, and do not click to anythyng if you not sure.
It's time to pick up some bones: click on bone_front, bone_back, bone_front_left, bone_front_right, bone_back_left, bone_back_right, bone_left, bone_right and bone_root. Click right mouse button and close pop up window. If everything done right, you should see a colorful bones and colorful points on moving parts.
Seems they are now animated, but... hold on! XSI is lie to you! In the game, most of animated parts will be messed up. So, you have no any choise and need to reset all of the animations manualy. In right panel, click button, named Point. Crop all of the points on the animated moving part. Make sure those part, should belong only one certain animated bone (have only one color) and click next buttons: Envelope>Reassign Locally. By left mouse button, pick exactly bone, which those model parts should be belong, and click right mouse button. You may not spot any chagings after this, but trust me: they are happens.
Do not forget: a_thing model part, should have a bone_root animation.
Step 4.
Animation.
Set timeline panel from 0 to 8. Click on some bone, which should move (usualy it's only rotation), and click under Transform right panel, some of the rotation directions, which one of you like it move: X, Z, or Y. Now rotate it to the limit you whish, and click to the big key icon button, to create first key frame (red marking). There is should be only 9 keyframes, and each one responsible, for certain direction, in which hover may move in game. I may suggest to not move bones manualy, and just tipe certain number of rotation angle under rotation panels. It makes all other animated parts move simmetricaly and easy to set up. After this, move timeline cursor one step left, by small cube button, with this icon: > and create next keyframe, till you made all 9 of them. The same process, should be done for all animated bones except bone_root.
So, for what of the directions responsible all of those keyframes? Let's see:
0 = forward, turning left.
1 = forward.
2 = forward, turning right.
3 = strafe left.
4 = not moving.
5 = strafe right.
6 = backwards, turning left.
7 = backwards.
8 = backwards, turning right.
Perhaps, with my hover direction translate interpritation image, it's could be more understendable:
Step 5.
Overall setup.
There is exist 2 ways to set animated parts, so you have to choose:
1. Separated method.
You may left them as they are, but in this case, you have to add their names to your msh.option file:
-keep fin_front, fin_back, fin_front_left, fin_front_right, fin_back_left, fin_back_right, fin_left, fin_right
2. Merge method
You have to merge all moving parts to single model, by clicking under Create panel:
Poly. Mesh>Merge>Materials, UV's, VertexColors, Weight Maps Merge and Shape Animation, Envelope Weight... Merge.
But, I am afraid, you have to again Reassign Locally all of the colorful points, and sometimes, it's realy bored work.
Non animated body part(s), should be puted under bone_root
Scroling parts (wheels & treads) also can be animated, but they are always should be stay as separated models, named wheel_left and(or) wheel_right, so in msh.option they can be supported by this line:
-keepmaterial wheel_left wheel_right
Important note: if your hover have a turrets, or any moving main guns, make sure, they are not share any textures, with animated hover parts, or your turrets will be just drop down!
Step 6.
Collision.
For non animated part of the hover it's could be enough reducted version of the body, named collision. To make it, just copy or merge not moving body parts, and click under Modify panel: Poly. Mesh>Polygon Reduction>Ratio 50 or 70 (depends of your model limits), and put it under bone_root. Such collision, could be nice for ordance or soldiers, but for building and vehicles, it's too complicated and it's better to use collision primitives anyway. Hide them, by click "H"
Collision Primitives.
As we already know, they shouldnt be freezed or resized by Translation panel (except cubes). Also, because of current issues of the last ZETools version, Length of the cube primitive, should be decreased in twice, before export. So, name them as p_cube1, p_sphere1 etc. and put under any animated bone (if it's needed) for moving parts, and under bone_root for non animated body. Hide them, by click "H"
SpringBody.
This type of collision, may be generated by the game itself, can be sets up by .odf, have no more then 6 spheres, and it's needed mostly for terrain and building collision. This collision can be visible in SPTest, if you choose free camera and render collision mode. In odf, it's usualy look's like this:
Code Select
AddSpringBody = "1.8 1.4 1.7 2.5"1.8 = left & right direction coordinates of the sphere1.4 = forvard & backward
1.7 = up & down
2.5 = size
Step 7.
Shadow.
This thing is a mix, between collision and animation making. You have to copy all animated and non animated parts, reduce polygons, and merge them just like any normal animated parts. I may suggest to delete all inputs, when you merge them. Most bored part: you have to Reassign Locally all of the animated points (again). Even parts, that shouldnt be moved have to be animated, and they are belong to the bone_root. Name it sv_hover or sv_somehow, and put it under bone_root. Don't forget to put -shadowOn line in msh.option file. Hide it, by click "H"
Step 8.
Lowrez.
It's realy needed for the long range. Usualy, it's may no need animation at all, so it's just a merged and reduced hover parts, named lowrez. Still the memory of the game, can be overloaded not just by polygons, but also by big tga's. At least all stock vehicles have very small lowrez tga's. How to replace texture names in XSI... I know one way, but it's long and bored (you have to merge models with new textures, and use Material Manager after). Let's make it quick: export your lowrez with ZETools, open it with HEX Editor, and change texture names, by replacing any new letter or adding _lowrez endings, to each tga name. In this case, you have to fix it, with MSH_TAG_SIZE_VALIDATION_TOOL. Import it back, under Modify panel click Poly. Mesh>Weld Boundary Points/Edges>Distance 0,002 (usual action when importing something). Now, put the new lowrez under bone_root. Right mouse button click Properties>Viewing>Visibility and uncheck Render Visibility.
Step 9.
Hardpoints.
Add a Cone, and make for it's Base Radius and Height about 0,02 or so. Name it hp_damage1 etc. and translate it to any possible damage places on your hover, so it's will be the place, where the damage fires starts on. I guess the limits for them is 8 or so. Hide them, by click "H". ODF lines for it looks like this:
[spoiler]
Code Select
DamageStartPercent      = 20.0
DamageStopPercent       = 0.0
DamageEffect            = "vehiclesmoke"
DamageEffectScale       = 1.5
DamageInheritVelocity       = 0.5
DamageAttachPoint       = "hp_damage_1"
[/spoiler]They could be putted under bone_root or under any bone, if moving part need some fire.Almost the same for hp_pilot, if you need to see a soldier pilot in your hover, but the odf lines could be next:
Code Select
PilotPosition       = "hp_pilot"
PilotAnimation      = "man_minigun"
Hardpoints, surely also needs for main guns and turrets, but they are deserve their own tutorial.Step 10.
Chunks.
If your hover can be destroyed, it's culd be a bad manner for it, to just dissapear. So, do not forget about chunks. Copy all needed animated and non animated parts. For animated parts click Envelope>Remove Envelope. Sometimes, you have to cut body to smaller parts, make insider polygons and add new textures (don't forget to remove old one first). Export them one by one, putting under any new maded Null. You may also add a hardpoint to them, so they may have a smoke trail. In .odf exist alot parametrs for them:
[spoiler]
Code Select
CHUNKSECTION            = "CHUNK1"
ChunkGeometryName       = "head_chunk"
ChunkNodeName           = ""
ChunkTerrainCollisions      = "5"
ChunkTerrainEffect      = "explosion"
ChunkTrailEffect            = "mediumsmoketrail"
ChunkPhysics            = "FULL"
ChunkOmega          = "2.0 3.0 1.5"
ChunkBounciness             = 0.45
ChunkStickiness             = 0.25
ChunkSpeed          = "7.0"
ChunkUpFactor           = "1.50"
ChunkTrailEffect        = "mediumsmoketrail"
ChunkSmokeEffect        = "smokeplume"
ChunkSmokeNodeName      = "hp_smoke1"
[/spoiler] The most important thing: you should never add -nocollision line in chunk msh.option, or it will crash the game.Step 11.
Material Manage.
Before export, I may suggest to save the Scene, and click on blue Render theme. Select model, under Modify panel click Materials, and use material manager. By using mouse cursor, in the left side of the pop up window, try to replace all similar materials in to the one. It's may decrease size of the model, and makes future hex editing easy. Just be careful, and never mix materials for bump, scroling, specularity etc.
Step 12.
Export.
hover.msh
Make sure your timeline cursor is on the 4. It's neutral position for hover, and it's always should be at 4 as default.
Click on the Dummyroot, and click on it middle mouse button. All hierarchy should be semi transparent white color. Click on ZETools>Export Mesh.>Check Sel (no Bad Faces warnings should be appear, or you have to triangulate your model).
If everything is ok, click ZETools>Export Mesh.>Export. Export Animation and Current frame as Basepose, should be unchecked. No, you got your hover.msh!
all_hover_9pose.msh
Just like it was in the Door tutorial, now, you have to delete all of the model parts, and left only bones. Still, Dummyroot, and a_thing, which realy a models, are stay.
Export it, but this time check Export Animation, but Current frame as Basepose, should be unchecked. Now, you got your "9pose" and have to name it somehow. For example, it's will be all_hover_9pose.msh.
basepose.msh
Export the same, but this time, check Export Animation, and Current frame as Basepose both. You have to name it basepose.msh.
Step 13.
Animation Munge.
It's totaly similar, with the door animation munge, so there no big sense to repeat everything. Just name your folder like all_hover, put in there all_hover_9pose.msh, and basepose.msh, click munge, and get your all_hover.zaabin and all_hover.zafbin.
Step 14.
Odf Set Up.
Odf, it's a realy big story, but this time we set up mostly a hover animation, so let's do it. This lines should be putted in:
Code Select
AnimationName           = "all_hover"
FinAnimation            = "all_hover_9pose"
Well, I guess that's it!
Pretty simple after all isn't it?
 [/spoiler]
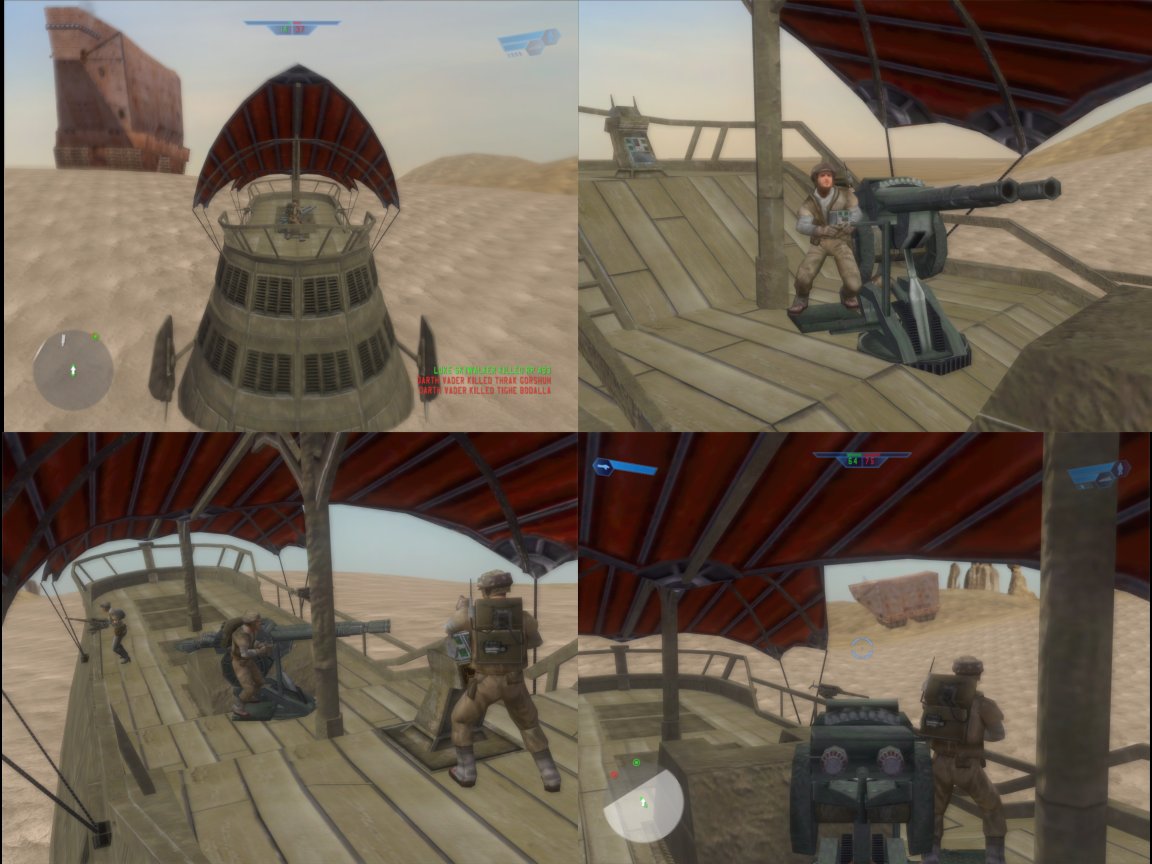 [/spoiler]
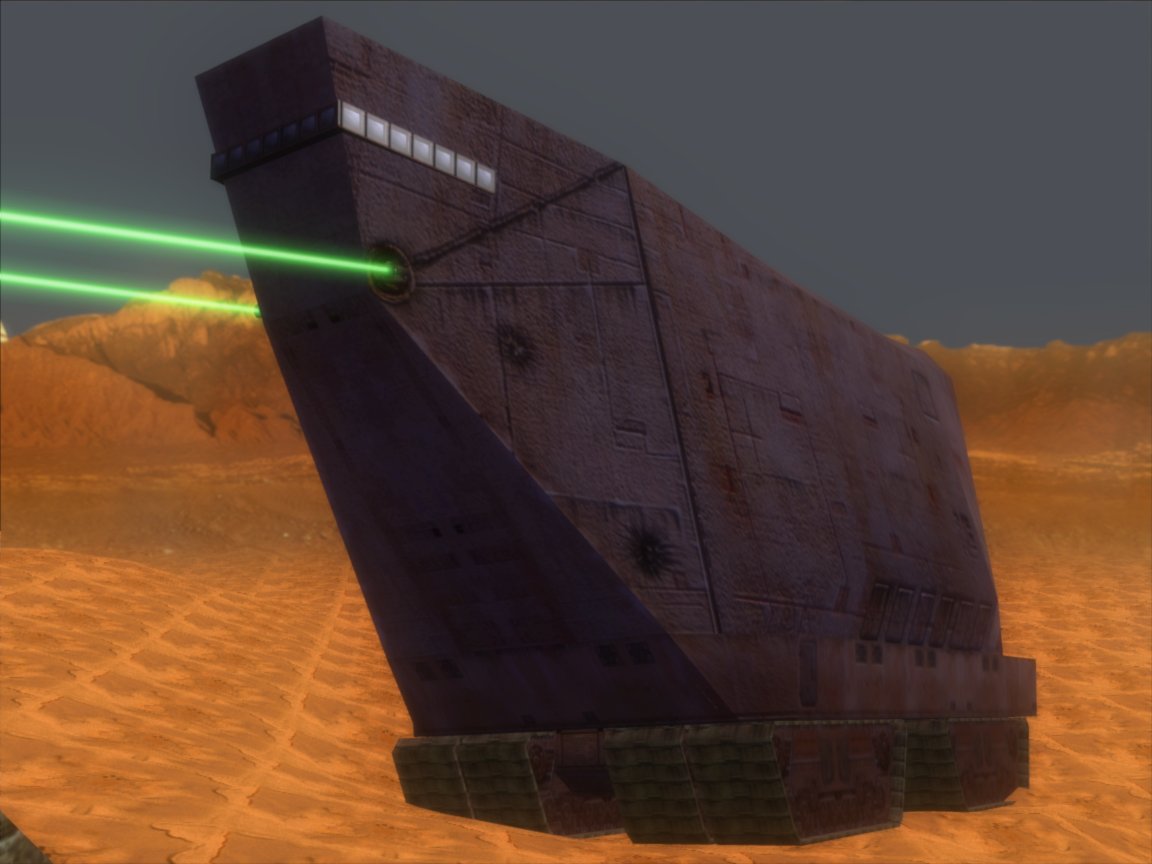 [/spoiler]
 [/spoiler]
 [/spoiler]
 [/spoiler]
 [/spoiler]
 [/spoiler]
 [/spoiler]
 [/spoiler]
 [/spoiler]
 [/spoiler]
 [/spoiler]
 [/spoiler]
 [/spoiler]
 [/spoiler]
 [/spoiler]
 [/spoiler]
 [/spoiler]
 [/spoiler]
 [/spoiler]
 [/spoiler]
