Title: Battle of Endor: Imperial Trap
Post by: Led on May 03, 2019, 06:53:16 PM
Post by: Led on May 03, 2019, 06:53:16 PM
Battle_of_Endor_ImpTrap.rar
https://www.swbfgamers.com/index.php?action=downloads;sa=view;down=1485 (https://www.swbfgamers.com/index.php?action=downloads;sa=view;down=1485)
https://www.swbfgamers.com/index.php?action=downloads;sa=view;down=1485 (https://www.swbfgamers.com/index.php?action=downloads;sa=view;down=1485)
Title: Battle of Endor: Imperial Trap
Post by: Napseeker on May 03, 2019, 07:02:40 PM
Post by: Napseeker on May 03, 2019, 07:02:40 PM
From the readme:
ENDOR: IMPERIAL TRAP (ver 1.0) map for SWBF1
Released: May 4th 2019
Author: Napseeker
This map was intended to be played as an Instant Action map, with the player choosing the Rebels team. However it can also be played in multiplayer and comes with a MAPINFO.TXT file.
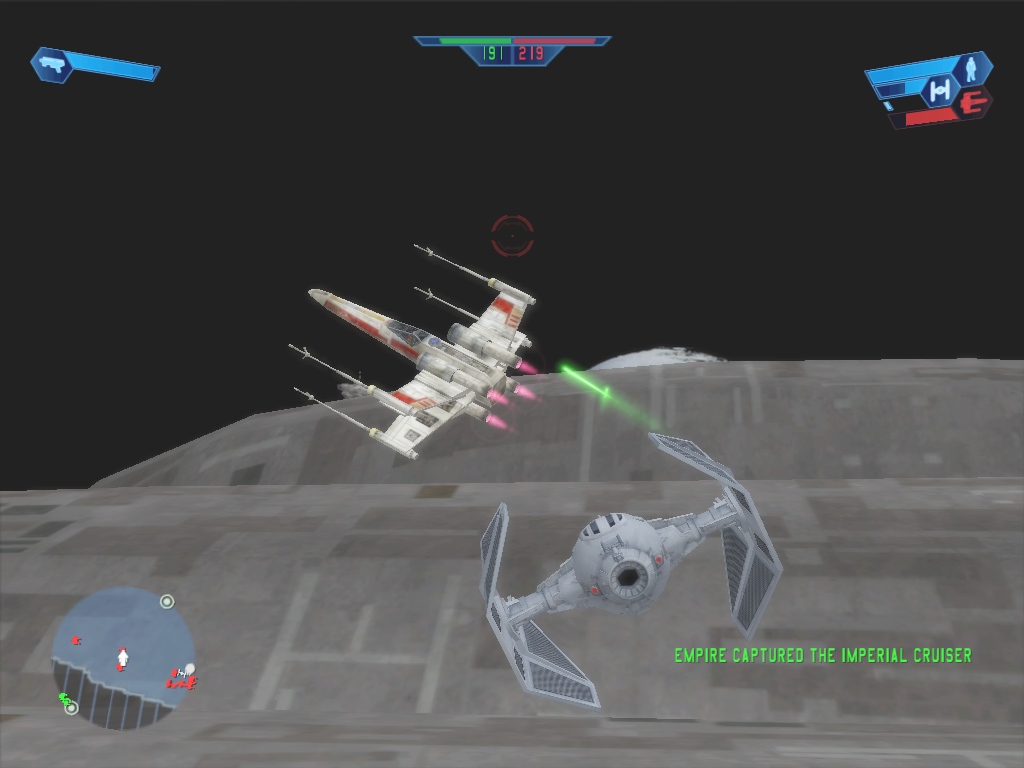
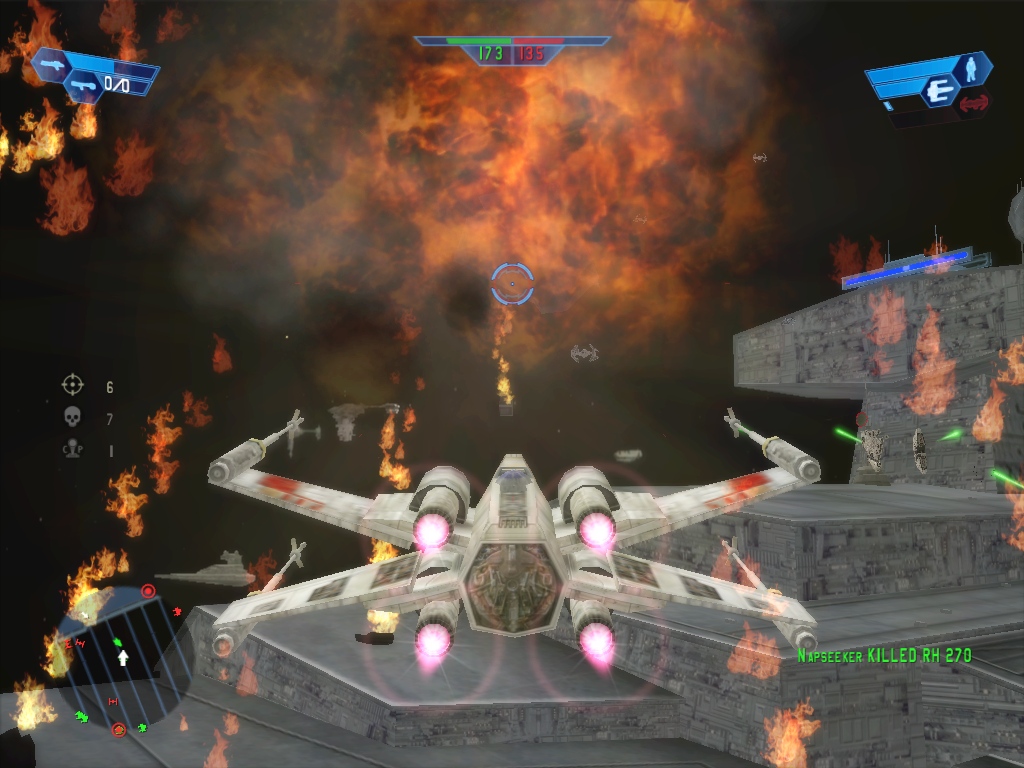
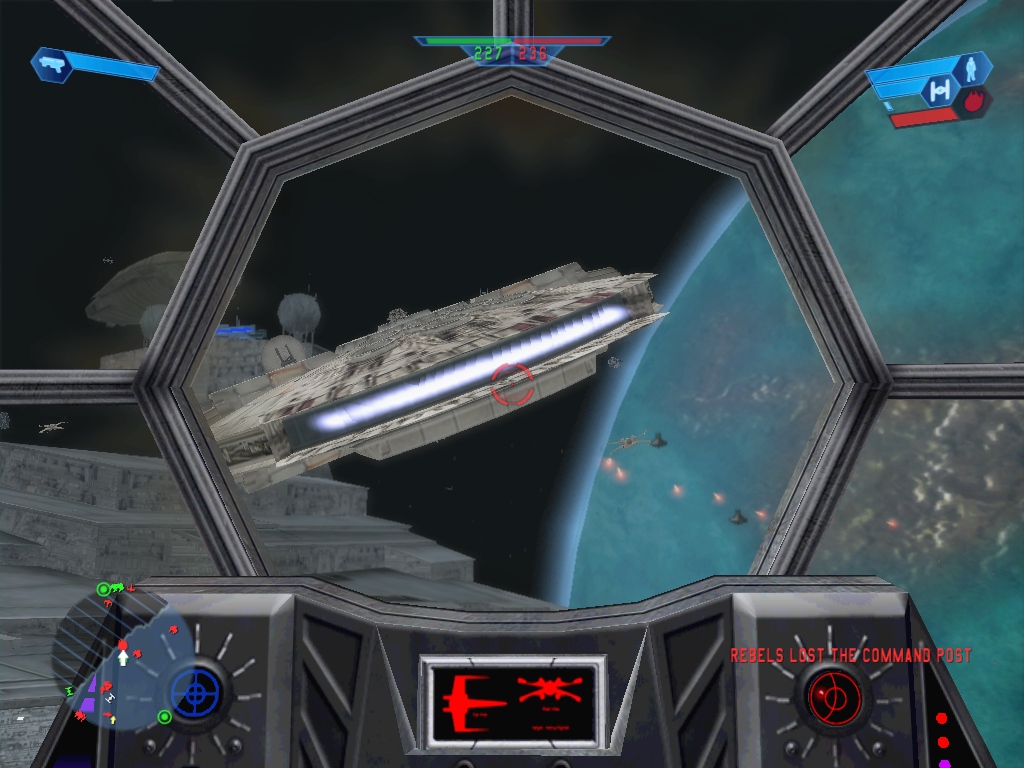
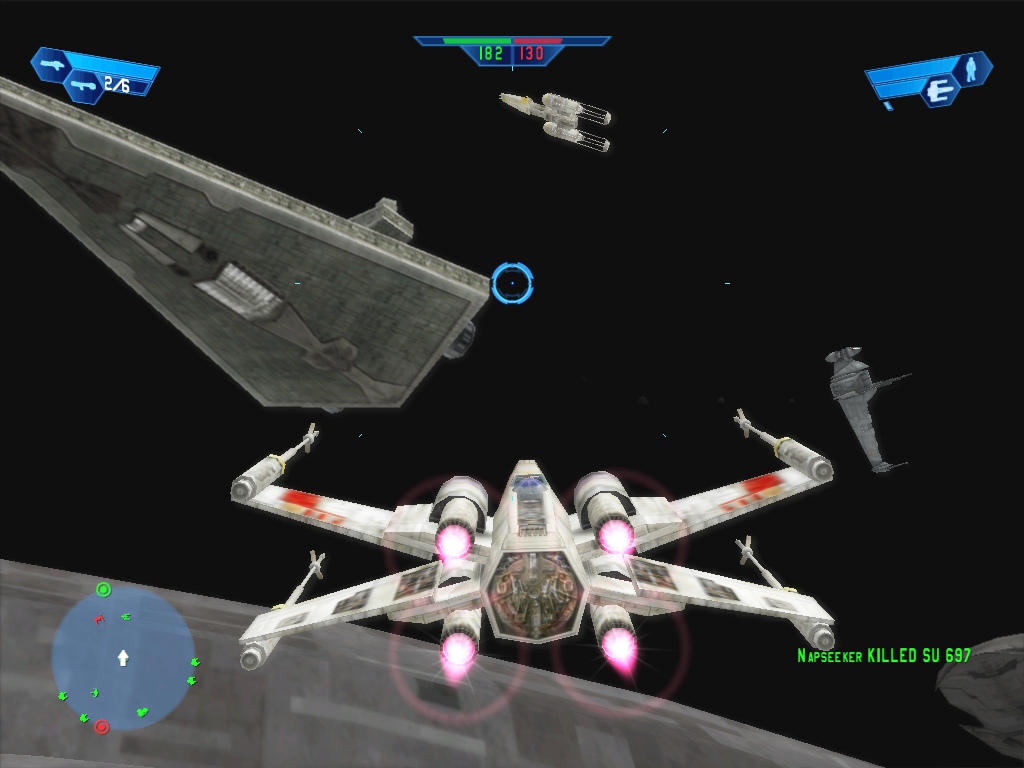
My goal was to create a companion map to the "Endor: Bunker" map that comes with SWBF1, in order to recreate the full end battle from Return of the Jedi. Now you can fly the various Rebel and Imperial starfighters and attack enemy cruisers. The goal is to cripple the other team's cruiser, by destroying key systems (bridge, shield generators, cannons, etc). Once all of the enemy's systems have been destroyed, the team must capture the airspace between the two cruisers to claim victory (you fly around in the designated area and wait for the CP to become yours, just as you would if you were capturing a CP on the ground).
Unlike my earlier space map from 2008, "Battle of Coruscant: Space", this map does not include any ground battles, the focus is on space battles only and capturing the single CP airspace.
There have been one or two other Battle of Endor space maps prior to mine, but what I felt was missing from these earlier maps was support for Instant Action (single-player). They were clearly meant for multiplayer games, and not well-suited towards playing as a single player match. What I aimed for in my map was to give the player the sense that this battle was taking place admist a much larger fleet battle (similar to what I had already done with my Battle of Coruscant map) so I surrounded the two primary cruisers with additional ships. Plus, the music is all-new, since none of the standard shipped music streams were suitable for recreating that RotJ feeling.
The fact that you do not automatically win once all the enemy systems have been destroyed is to add a nice twist to any multiplayer games, because the team that has lost all of their systems can still win if they can maintain ownership of the airspace between the two cruisers. This can buy the players extra time to destroy all of the systems of the first team, until both sides are both left with disabled cruisers and must fight it out for the airspace in order to secure the final win. Hopefully that makes it a bit more fun.
INSTALL INSTRUCTIONS:
Just copy the "bofe" folder into your addon folder e.g.
C:\Program Files\LucasArts\Star Wars Battlefront\GameData\AddOn\
You should now see the "Endor: Imperial Trap" map listed among the other maps once you start the game. Please note that if the map crashes, you may have exceeded the maximum (safe) limit for maps that can be put in your addon folder. I think the limit is 25, so try moving out other map folders and running SWBF1 again if you do see a crash happen or if other maps start to crash.
GAMEPLAY NOTES:
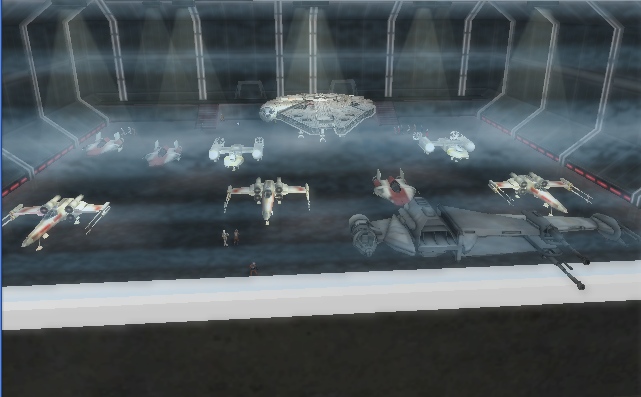
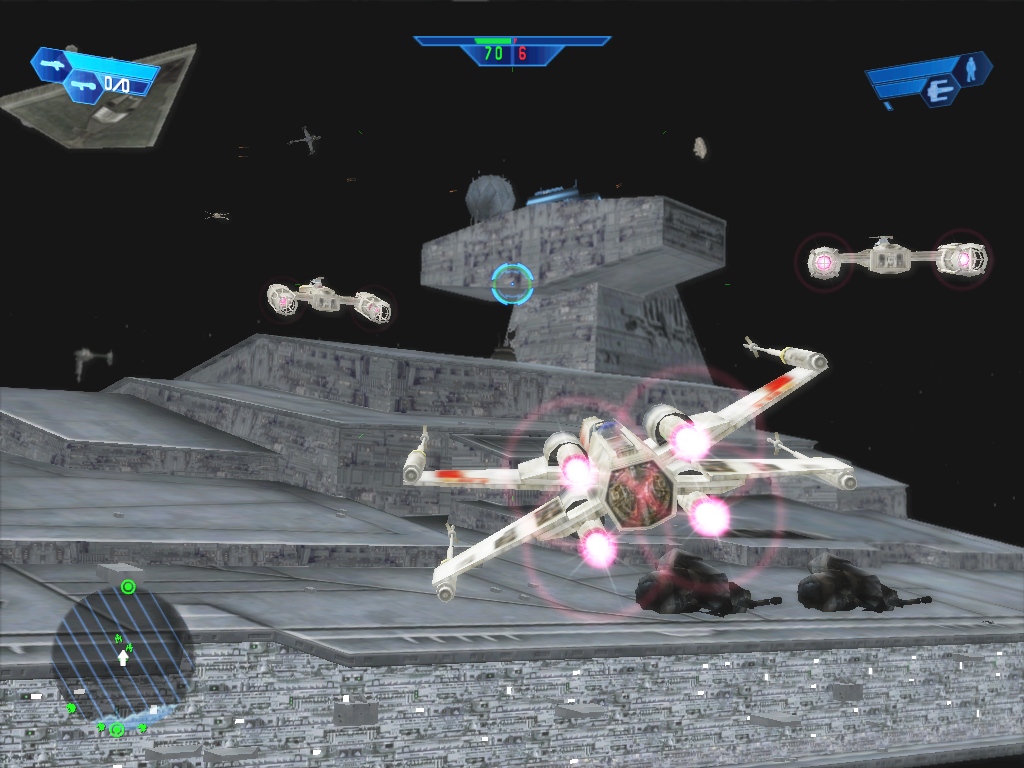
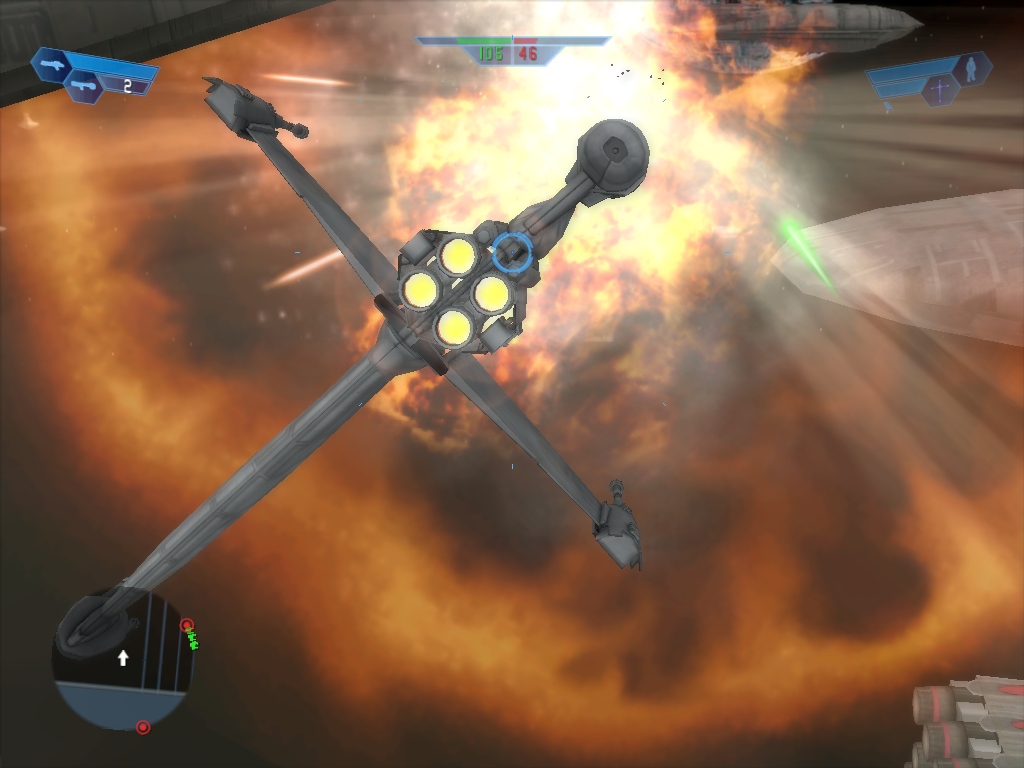
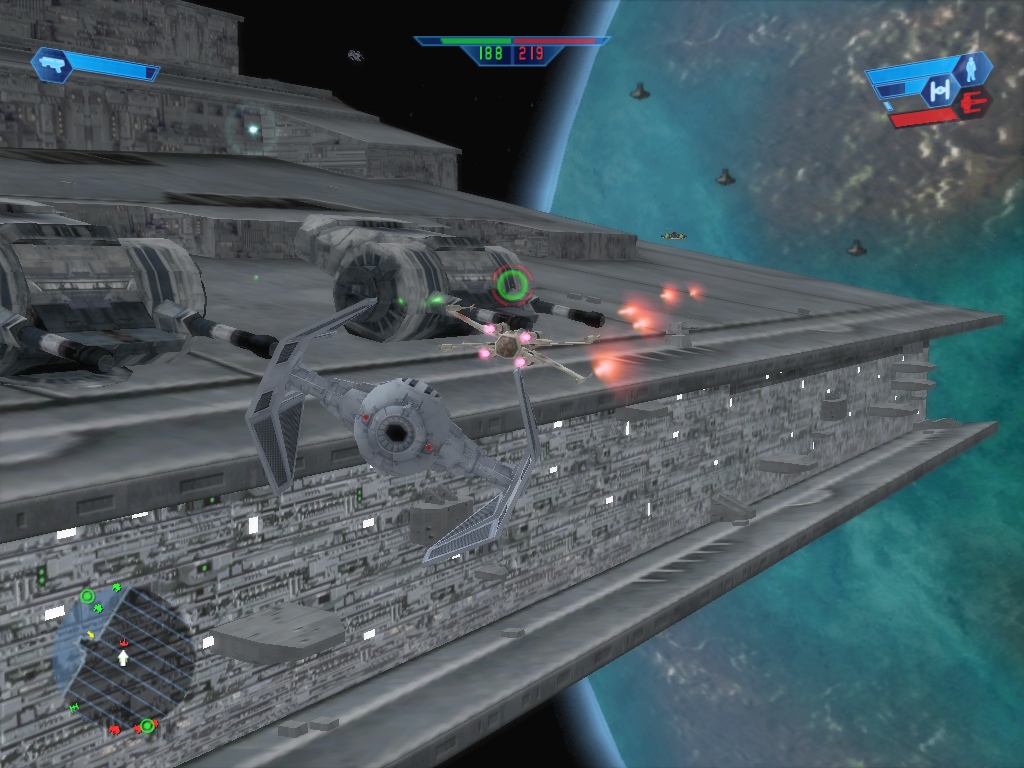
1) the Imperials have twice the number of fighters than the Rebels, these are the standard Tie Fighter, Tie Interceptor, and Tie Bomber. The Tie Bomber is the most effective choice to destroy the targets on the MonCal cruiser, so use your other Ties to protect it while it does a bombing run against the rebels.
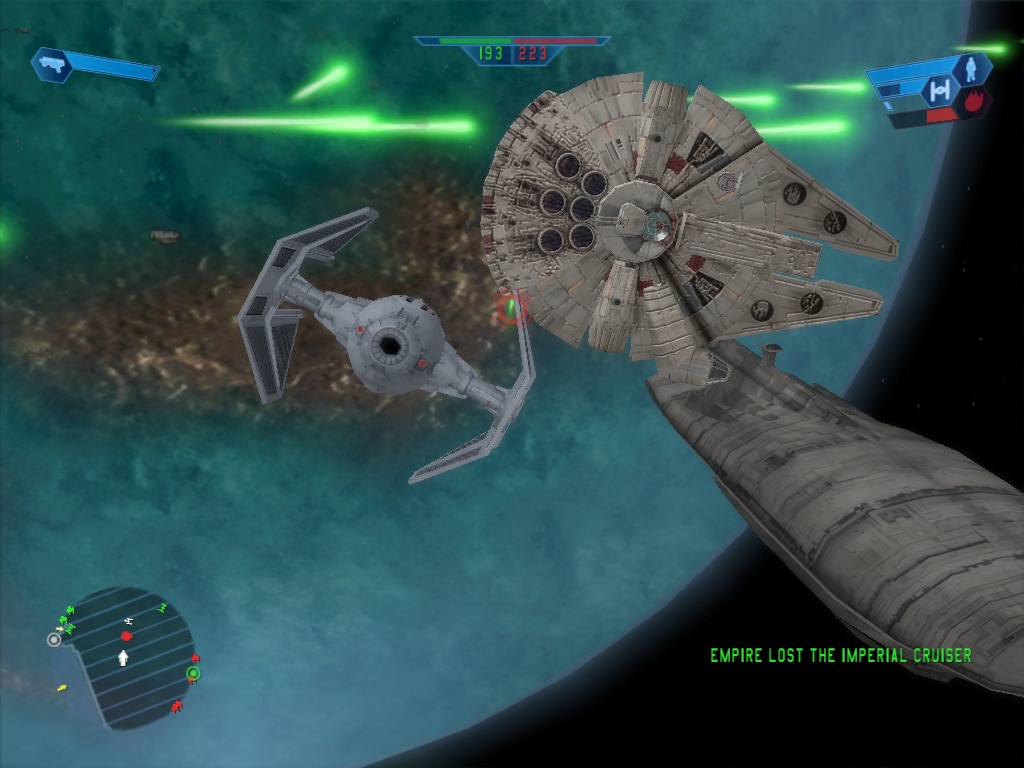
2) the Rebel Alliance have more powerful fighters than the Empire: X-Wing, Y-Wing, A-wing, B-Wing and the Millenium Falcon. The Falcon is an especially powerful ship and has multiple weapons. Both the Falcon and B-Wing's armaments are ideal for attacking the more heavily-shielded Imperial targets like the bridge and shield generators.
3) If you don't want the Millenium Falcon available for the game, then pick the "CW" era since this will replace the Falcon in the rebel hangar with a Y-Wing and an X-Wing. The Falcon is only available if you choose the "GCW" era. That is the only difference between the two eras.
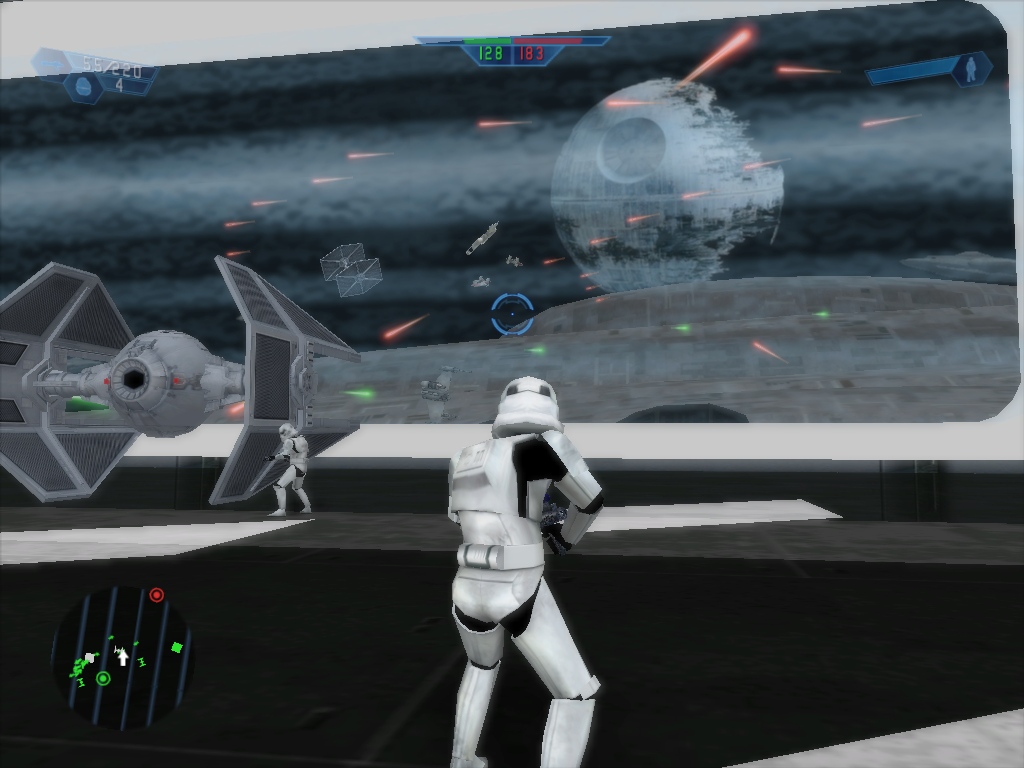
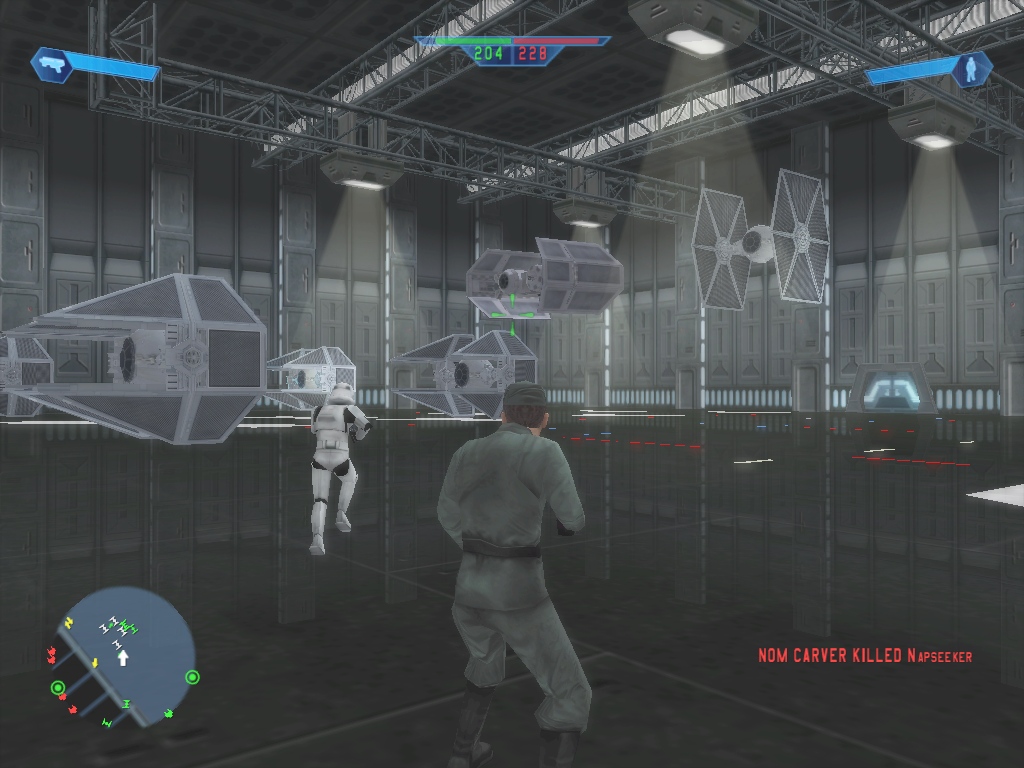
4) each cruiser is protected by AI-controlled surface cannons that will shoot down any fighters that get near enough. It is possible for the player to target the cannons and kill the gunners in order to reduce the chances of being shot at while flying over the enemy cruiser, but it will be fairly hard to get all of them. There are certain safe spots that the player can fly to where the enemy turrets won't be able to easily shoot at them, and from these spots the player can attack the cruiser's systems without worrying about being shot down. You'd still have to watch out for enemy fighters though!
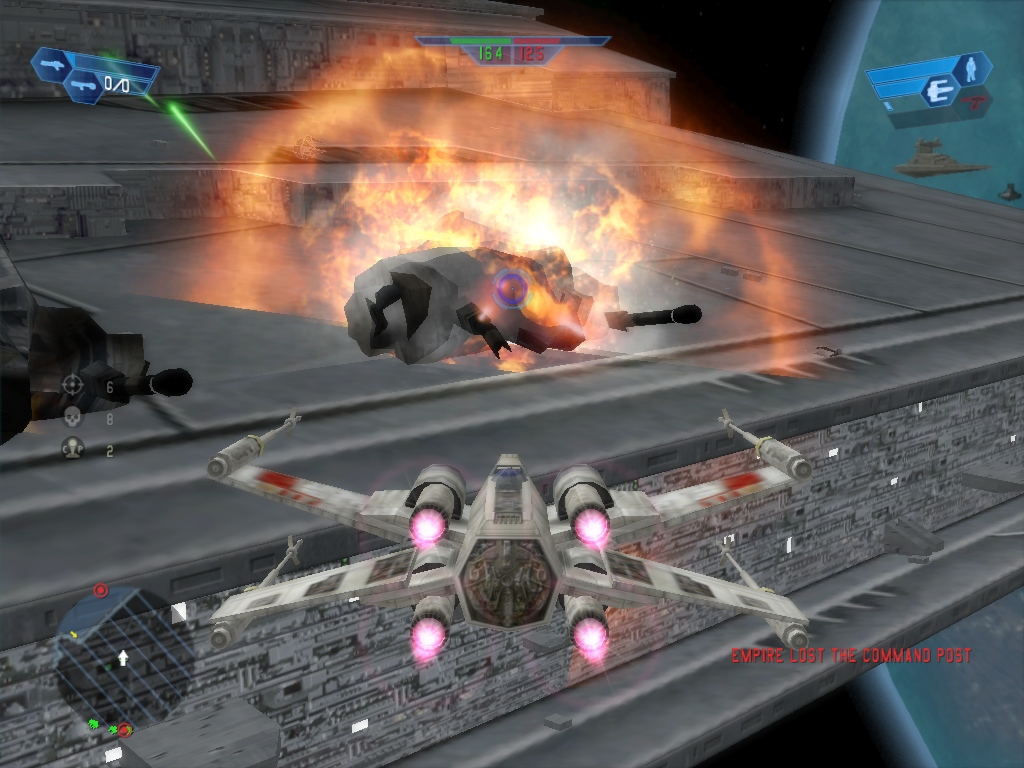
5) As each target on a cruiser is destroyed, it depletes how many fighters that cruiser can spawn. This is critical to the gameplay: the more critical systems are blown up, the more you reduce the enemy's ability to spawn starfighters. Each system controls the spawning of a specific number and type of fighter e.g. if the Mon Cal bridge is destroyed, the rebels lose an A-Wing and the Falcon (if playing GCW era) or an X-Wing and Y-Wing (if playing CW era). Whereas if the Star Destroyer bridge is destroyed, the Empire loses 5 fighters (Tie Bomber, 4 Tie Interceptors).
6) in the Rebel hangar, there will be an X-Wing fighter that is waiting for the human player (it won't be claimed by the AI pilots). This fighter will always respawn UNLESS the Imperials destroy the Mon Cal cruiser's communications array (located along the mid-rear spine of the ship). Similarly, on the Imperial hangar, there will be both a Tie Interceptor and Tie Fighter that won't be taken by the AI so that the human player can pick one to fly. Again, if a certain Imperial system is destroyed, it will stop these 2 fighters from respawning.
The player doesn't have to fly the X-Wing or Tie Fighter/Interceptor that has been reserved for them. The player can always hop into another starfighter like an A-Wing, but regardless, the AI bots will never enter into these reserved fighters so these will just end up sitting in the hangar bay.
7) Once a team's reinforcement count reaches 25, they lose their starfighter support. At that point, they are effectively helpless against the enemy's fighters (other than whatever AI turrets are still alive) who can attack the remaining cruiser systems at will. So instead of trying to blow up all of an enemy cruiser's systems, you can also try to win by just whittling down their reinforcements to 25.
TARGETS to ATTACK (6 systems on each cruiser)
--------------------------------------------------------------------------
1) If playing as the Rebels, then these are the targets to destroy on the Imperial Cruiser:
a) bridge module - toughest one to destroy, use your proton torpedoes to shorten the time to blow this up
b) shield generators - located to either side of the bridge module, also requires a long time to blow up
c) side cannons - there are two located on the side facing the Mon Cal cruiser; these are among the easiest to blow up
d) communications array - located near the rear of the ship, along the spine. Easy to destroy but you must fly through a bevy of Imperial turrets to get to the array!
--------------------------------------------------------------------------
2) If playing as the Empire, then these are the targets to destroy on the Mon Calamari Cruiser:
a) bridge module - toughest one to destroy, the Tie Bomber is the most effective choice to attack this target
b) side cannons - there are four cannons located on the side facing the Imperial Cruiser, very easy to destroy even just firing on it with regular Tie Fighters or Tie Interceptors
c) communications array - located on the spine of the ship around the middle-rear. Blowing this up will cause the rebel player to lose access to the reserved X-Wing.
--------------------------------------------------------------------------
KNOWN ISSUES
- the B-Wing will sometimes collide into the hangar as it tries to take off and blow itself up. Not much can be done about this. I've played around with moving its spawn position and adjusted the takeoff height and the current situation is about as good as it gets. The hangar is just too small to allow room for the B-Wing to fly out of it (that's why I had to put it so close to the exit). The Falcon may also collide into the B-Wing in some cases since both are very large vehicles so if they are trying to exit the rebel hangar around the same time, they may crash into one another.
- many times, the units will slide instead of walk, this is likely due to low animation memory. Not sure how to resolve this since I've tried different settings in the mission script without fixing this problem.
PLANS for ver 1.1
- the AI units seem to gather in one corner of the rebel hangar, I've tried to adjust the pathing to stop this but so far no luck fixing the issue.
- when you blow up an enemy fighter, you can hear the death scream of the pilot (even though you're in outer space). I'd like to silence this since it doesn't make any sense.
- some units don't have proper lowrez units, I've just substituted the normal resolution models for the lowrez.
---------------------------------------------------------------------------------------------------------
CREDITS:
Original SWBF1 and 2 assets and ODF files - Pandemic
Millenium Falcon - Sereja
A-Wing - Teancum
B-Wing - Sereja
Imperial officer - from the chainisle project (psychofred)
Sound tutorial - ChainIsle project (psychofred)
Tie Interceptor - GGctuk's SWBF2 ship pack
MonCal officer - Bamdur (with new textures by Napseeker)
Nien Nunb - Teancum
Wedge credits:
Free Radical - mesh and textures (SWBF3)
Sereja - pistol
Teancum - Rigging, character setup
RebelCaptain credits:
Sereja - Unit Design.
Pandemic - SWBF1 and SWBF2 assets.
tirpider - Kitbashing and Hexediting.
General Madine
from infantry_conversion_pack.rar (with texmap tweaked by Napseeker to add blue arms, blue badge, darker belt, silver buckle, browner uniform)
DH-17 rebel pistol - Sereja
Low-rez versions of MonCal Officer, Ackbar, Nien Nunb, Wedge by Napseeker (using SchMEe by tirpider)
Note that these "low-rez" meshes are still high-polygon, it's just that their skeletons have been altered to be compatible with what SWBF1 expects from a low-rez msh.
R2-D2 chunk parts - Ghost
---------------------------------------------------------------------------------------------------------
CLICK BELOW to see more screenshots from the map:
[spoiler]
[/spoiler]
Title: Battle of Endor: Imperial Trap
Post by: Giftheck on May 03, 2019, 11:03:00 PM
Post by: Giftheck on May 03, 2019, 11:03:00 PM
Welcome back, Napseeker! This looks fantastic! I can't wait to try it out for myself! :cheers:
EDIT: This is actually a really good, well put-together space map. Doesn't require boarding, just requires you to go out in a ship, damage the critical systems and capture the airspace between the two ships.
I did notice one or two things. First off, it seems units 'freeze' when walking/running sometimes. I know why this is happening: there may be too many high-poly models on the map at once. Have you tried using Sleepkiller's model-edit to 'trick' the game into thinking models are lower poly than they actually are?
Second, there are one or two sound issues (A-Wing has no engine or missile sounds). The Falcon sounds aren't accurate but I'll not pick that apart too much since they still work.
I also noticed some missing localization, particularly when spawning from the Imperial hangar.
Also of note is the fact that the 'dome' Star Destroyers seem to clip into the map at will. In fact, I had one phase right through the Star Destroyer while trying to attack it.
Otherwise, this is a really nice space map. I'm happy to say that you haven't lost your touch with these, and I look forward to seeing a 'next' version, or whatever comes next from you.
Title: Re: Battle of Endor: Imperial Trap
Post by: Napseeker on May 08, 2019, 10:17:29 AM
Post by: Napseeker on May 08, 2019, 10:17:29 AM
Thanks very much for the feedback Giftheck, I really appreciate you taking the time to post it.
Yes, I should've mentioned the problem about the dome Star Destroyers in my readme. It's a known issue, but one that I'm not sure I can fix. It was tough trying to find the right setting to have the dome models appear around the two main cruisers. I wanted them close enough so that the two cruisers looked like they were encircled by the rest of the fleet, but this does sometimes results in the Star Destroyers appearing way closer to the real cruisers than they should. And yeah, I've flown through them a few times while chasing Ties around the map, it's unnerving to feel like you're going to crash into them...
I didn't realize the A-Wing was missing sounds... for both the A-Wing and Falcon, I basically just installed them into the ODF / msh folders and barely played with them. I'll try to fix up the sounds for the A-Wing at least for the 1.1 release. I should probably check out the B-Wing too, since I barely flew it (boy that thing is awkward to fly!)
Do you have a link to Sleepkiller's low poly trick? I'll definitely see if that can fix this really annoying problem. Increasing the animation memory didn't do anything so I'm hopeful that this trick would resolve the issue.
Title: Re: Battle of Endor: Imperial Trap
Post by: Giftheck on May 08, 2019, 10:37:29 AM
Post by: Giftheck on May 08, 2019, 10:37:29 AM
Quote from: Napseeker on May 08, 2019, 10:17:29 AM
Thanks very much for the feedback Giftheck, I really appreciate you taking the time to post it.
You're welcome, I enjoyed playing it.
Quote from: Napseeker on May 08, 2019, 10:17:29 AMDo you have a link to Sleepkiller's low poly trick? I'll definitely see if that can fix this really annoying problem. Increasing the animation memory didn't do anything so I'm hopeful that this trick would resolve the issue.
Sleepkiller's model_edit tool can be found here: http://www.swbfgamers.com/index.php?topic=12234.0
It's not a perfect fix (no 10k poly unit models, for instance, and it's not a good idea to set the factor too high) but I've been using it on all of my mods since Sleepkiller released it and it does allow you to get away with more as far as poly counts go. It also works with map models too.
Title: Re: Battle of Endor: Imperial Trap
Post by: Dark_Phantom on May 08, 2019, 11:38:23 AM
Post by: Dark_Phantom on May 08, 2019, 11:38:23 AM
I can't wait to try this map! It looks amazing.
Napseeker, your maps were some of the first ones that I picked up when I started playing mods and then try to create them and they've always impressed me.
Napseeker, your maps were some of the first ones that I picked up when I started playing mods and then try to create them and they've always impressed me.
Title: Re: Battle of Endor: Imperial Trap
Post by: Napseeker on May 13, 2019, 10:13:28 AM
Post by: Napseeker on May 13, 2019, 10:13:28 AM
Quote from: Dark_Phantom on May 08, 2019, 11:38:23 AM
I can't wait to try this map! It looks amazing.
Napseeker, your maps were some of the first ones that I picked up when I started playing mods and then try to create them and they've always impressed me.
Thank you DP! I'm glad a few folks still remember those early mods (exciting times back then, exciting time... ) and if any of my mods do need updating of their assets it's those ones; I definitely need to go back and replace some of those meshes. I was just playing my Empire vs Clones mod last week and that "Death Star Trooper" reskin did not sit well with me. Ouch. I hope someone released a more accurate version in the past 10 years.
@Giftheck: just downloaded the tool and will give this a shot. Maybe I'll apply it to the vehicle models (the Falcon for example) and see if that does anything.
I played the A-Wing last night and realized that yeah, the missing sound was due to the use of the snowspeeder soundfx in the ODF, which obviously aren't loaded for this map because I'm using a sound bank that only included the xwing and ywing fx but nothing from Hoth. I supposed I'd have to add custom sound to support the A-Wing (adding the xwing's won't work because of the R2D2 squeals and whistles which don't fit in with the A-Wing). Not sure, but did anyone ever extract the game's shipped sounds?
Title: Re: Battle of Endor: Imperial Trap
Post by: Giftheck on May 13, 2019, 10:21:10 AM
Post by: Giftheck on May 13, 2019, 10:21:10 AM
Quote from: Napseeker on May 13, 2019, 10:13:28 AM
Thank you DP! I'm glad a few folks still remember those early mods (exciting times back then, exciting time... ) and if any of my mods do need updating of their assets it's those ones; I definitely need to go back and replace some of those meshes. I was just playing my Empire vs Clones mod last week and that "Death Star Trooper" reskin did not sit well with me. Ouch. I hope someone released a more accurate version in the past 10 years.
@Giftheck: just downloaded the tool and will give this a shot. Maybe I'll apply it to the vehicle models (the Falcon for example) and see if that does anything.
I played the A-Wing last night and realized that yeah, the missing sound was due to the use of the snowspeeder soundfx in the ODF, which obviously aren't loaded for this map because I'm using a sound bank that only included the xwing and ywing fx but nothing from Hoth. I supposed I'd have to add custom sound to support the A-Wing (adding the xwing's won't work because of the R2D2 squeals and whistles which don't fit in with the A-Wing). Not sure, but did anyone ever extract the game's shipped sounds?
Funny you should mention extracted stock sounds. id-daemon on zenhax created a tool which I used to extract the stock sounds, which I tagged and uploaded here: https://www.mediafire.com/?b4cunujijocica4
Title: Re: Battle of Endor: Imperial Trap
Post by: Red04SWBF on May 13, 2019, 11:32:42 AM
Post by: Red04SWBF on May 13, 2019, 11:32:42 AM
Very nice map! Space maps have always fascinated me. :tu:
Title: Re: Battle of Endor: Imperial Trap
Post by: 411Remnant on May 15, 2019, 09:45:56 PM
Post by: 411Remnant on May 15, 2019, 09:45:56 PM
https://youtu.be/oXS8BNpNI68
Recorded some gameplay. Really enjoy this release!
Recorded some gameplay. Really enjoy this release!
Title: Re: Battle of Endor: Imperial Trap
Post by: Napseeker on May 16, 2019, 10:40:39 AM
Post by: Napseeker on May 16, 2019, 10:40:39 AM
Quote from: Giftheck on May 13, 2019, 10:21:10 AM
Funny you should mention extracted stock sounds. id-daemon on zenhax created a tool which I used to extract the stock sounds, which I tagged and uploaded here: https://www.mediafire.com/?b4cunujijocica4
Awesome, man! I found the snowspeeder sound effect in your package last night. Now to see if I've learned enough about custom sounds to actually add it into the 1.1 release.
Do you know if there's ever been a recording of Ackbar saying "It's a trap!" ripped from a game? So wanted to put that bit of dialogue into my map release but I noticed that in the film, there's no way to get that vocal without then also getting the background music too. Was hoping somewhere in the last few decades they either got the actor to voice the line without any music, or they released the original voice recording minus the music.
@411Remnant - I'll check out your video tonight when I get home. Love to see videos of people playing my mods/maps! Someone did a recording of themselves playing my Star Trek mod 12 or 13 years ago and I had a blast watching them play it.
Title: Re: Battle of Endor: Imperial Trap
Post by: Giftheck on May 16, 2019, 10:47:53 AM
Post by: Giftheck on May 16, 2019, 10:47:53 AM
Quote from: Napseeker on May 16, 2019, 10:40:39 AM
Awesome, man! I found the snowspeeder sound effect in your package last night. Now to see if I've learned enough about custom sounds to actually add it into the 1.1 release.
Do you know if there's ever been a recording of Ackbar saying "It's a trap!" ripped from a game? So wanted to put that bit of dialogue into my map release but I noticed that in the film, there's no way to get that vocal without then also getting the background music too. Was hoping somewhere in the last few decades they either got the actor to voice the line without any music, or they released the original voice recording minus the music.
You're welcome :)
As for your second request, I looked through my sound banks and found one labelled 'Ackbar' from the old Star Wars Soundboards. It's taken direct from the film's stems, so the dialogue is clean. And 'it's a trap' is indeed in there clean. I have a literal ton of sound effects and dialogue from various sources, so if you need something else, hit me up.
Title: Re: Battle of Endor: Imperial Trap
Post by: Napseeker on May 16, 2019, 11:48:34 AM
Post by: Napseeker on May 16, 2019, 11:48:34 AM
Amazing, I never thought I'd hear Ackbar uttering "It's a trap" with so much clarity. Thanks! I don't think one can have a true RotJ Endor space battle map without hearing that line at least once during the game (or a dozen or so times until you're just sick of hearing it over and over, lol :D)
I didn't understand what you meant by "film's stems" as the source of the vocal. What's a stem?
I also vaguely recall Lando and Wedge saying a few lines. Just trying to recall if there was anything that was useful that wasn't too scene specifc e.g. "All craft, pull up" would be a bit odd to just hear out of the blue. What about Nien Nunb? Do you have any rips of his vocals? I was actually considering recording myself just speaking gibberish to make some vocals for my Sullustan pilot character... but that likely wouldn't come out sounding so great :P
Title: Re: Battle of Endor: Imperial Trap
Post by: Giftheck on May 16, 2019, 11:56:18 AM
Post by: Giftheck on May 16, 2019, 11:56:18 AM
Quote from: Napseeker on May 16, 2019, 11:48:34 AM
Amazing, I never thought I'd hear Ackbar uttering "It's a trap" with so much clarity. Thanks! I don't think one can have a true RotJ Endor space battle map without hearing that line at least once during the game (or a dozen or so times until you're just sick of hearing it over and over, lol :D)
I didn't understand what you meant by "film's stems" as the source of the vocal. What's a stem?
I also vaguely recall Lando and Wedge saying a few lines. Just trying to recall if there was anything that was useful that wasn't too scene specifc e.g. "All craft, pull up" would be a bit odd to just hear out of the blue. What about Nien Nunb? Do you have any rips of his vocals? I was actually considering recording myself just speaking gibberish to make some vocals for my Sullustan pilot character... but that likely wouldn't come out sounding so great :P
Basically a stem is equivalent to an audio channel.
As for Nien Nunb, I have a little bad news there: the only place I know of that has voice lines for him is EA's Battlefront. There likely is somewhere else for them, but that isn't among my files, unfortunately.
Title: Re: Battle of Endor: Imperial Trap
Post by: Dark_Phantom on May 20, 2019, 07:07:49 AM
Post by: Dark_Phantom on May 20, 2019, 07:07:49 AM
This is a great map - the bugs have already been mentioned and are not game breaking. It has a great atmosphere to it and the objectives are pretty clear if you've played any space maps before.
I will listen to "It's a trap!" until I am sick of it - it would be a great addition.
Note: going to try to play as turret gunner next time. Their character model is amazing. Team 3/4 are the real champs!
Yes, I checked to see what they looked like :)
I will listen to "It's a trap!" until I am sick of it - it would be a great addition.
Note: going to try to play as turret gunner next time. Their character model is amazing. Team 3/4 are the real champs!
Yes, I checked to see what they looked like :)
Title: Re: Battle of Endor: Imperial Trap
Post by: Napseeker on May 20, 2019, 12:17:09 PM
Post by: Napseeker on May 20, 2019, 12:17:09 PM
Quote from: Dark_Phantom on May 20, 2019, 07:07:49 AM
Note: going to try to play as turret gunner next time. Their character model is amazing. Team 3/4 are the real champs! Yes, I checked to see what they looked like :)
Hey now! Let's not look too closely under the hood... you'll ruin the illusion :P Those are some very detailed and intricate turret gunner models that I'm using, sitting at their equally detailed and high-polygon turrets, just firing away...
@411Remnant: I watched your video and wanted to make 2 comments, just to make sure it's clear to players who may have played the SWBF2 space map upon which these assets are based:
a) the engines of both cruisers are destructible, but as noted in my instructions, they are not part of the systems that you have to destroy in order for your team to win. I originally did include the engines as part of the victory requirements but I noticed that the AI often didn't attack them. Since I was trying to create an IA game where the player must participate or the AI will eventually win, I opted to make the side cannons into the targets (since they are more easy for the AI to access and attack), instead of the engines (which are at the rear of each cruiser and harder to fly to).
b) capturing the airspace between the 2 cruisers does not trigger a loss in reinforcements for the other team. I did consider doing this originally but I realized that I don't want a team to win by causing the other side to simply drip away their reinforcements. It felt too anti-climatic. I'd rather the teams win by either blowing up all of the enemy systems and then capturing the airspace, or win by obliterating all of the enemy's fighters. That felt more exciting :moo:
Title: Re: Battle of Endor: Imperial Trap
Post by: Dark_Phantom on May 20, 2019, 08:50:22 PM
Post by: Dark_Phantom on May 20, 2019, 08:50:22 PM
I have exposed the neglect of the Turret Gunners!
https://youtu.be/PJnVSh06Bhs
*Please play this map, it is a lot of fun as both sides, good ol' dogfighting and taking down the Empire! (and Rebellion)*
https://youtu.be/PJnVSh06Bhs
*Please play this map, it is a lot of fun as both sides, good ol' dogfighting and taking down the Empire! (and Rebellion)*
Title: Re: Battle of Endor: Imperial Trap
Post by: Napseeker on May 24, 2019, 09:32:20 AM
Post by: Napseeker on May 24, 2019, 09:32:20 AM
Quote from: Dark_Phantom on May 20, 2019, 08:50:22 PM
I have exposed the neglect of the Turret Gunners!
https://youtu.be/PJnVSh06Bhs
Folks, you don't want to click on that video link. Why? Because...
:D
Title: Re: Battle of Endor: Imperial Trap
Post by: Red04SWBF on May 24, 2019, 09:37:52 AM
Post by: Red04SWBF on May 24, 2019, 09:37:52 AM
I didn't notice turrets could be used! :slap:
[spoiler]
Nice trap! :P
[/spoiler]
[spoiler]
Nice trap! :P
[/spoiler]