

Night Of The Living Dead v1.11
Download NOTLD
-> Download NOTLD v1.11 MultiPlayer Patch <-
Download NOTLD SoundTrack
NOTLD Installation
Note: If upgrading from v1.0 patch, follow the same instructions, and click YES to overwrite all files
1. This mod is simple to install. First copy the ZOM folder to your _LVL_PC folder here
C:\Program Files (x86)\LucasArts\Star Wars Battlefront\GameData\Data\_LVL_PC
2. Then copy the NLD1 folder into your AddOn
C:\Program Files (x86)\LucasArts\Star Wars Battlefront\GameData\AddOn
3. Now launch SWBF, note if you want to play with MiniMap enabled, rename or delete the file NoMap.lvl
- Included here with the mod is the complete Design Document as of v1.1, broken into 3 sections: ReadMe, Credits, and Strategy Guide.
[spoiler]
NOTLD ReadMe
Night Of The Living Dead is a challenging mod map designed for Star Wars Battlefront, with an innovative wave-based style of apocalyptic zombie survival. A wide variety of enemy units are featured, including over a dozen types of zombies and deadly military soldiers. NOTLD also features scaling enemy number spawns for each each difficulty setting, utilizing advanced mission LUA scripts in order to provide a much greater fluctuation of challenge between difficulties.
A team of 6 random civilians (5 playable, 1 NPC) who have barricaded themselves inside an old farmhouse are determined to survive the horrifying onslaught of undead walking corpses thirsting for fresh human blood. Should your team happen to survive the zombie mayhem for over 20 minutes, a heavily armed military squad equipped with powerful vehicles will spawn from the west for final extermination. You must defend the farmhouse from being overrun by zombies and successfully defeat the military in order to win.
Advanced mission LUA modding methods were utilized to script a much larger difficulty gap between Easy, Medium, and Hard for this map. As the difficulty level increases, more zombies spawn at once, enemies have higher reinforcements and receive more intelligence bonuses, boss zombies are much stronger, etc. Easy is somewhat challenging to the average player, Medium is relatively difficult for most experienced players, and Hard presents a significant challenge to overcome for even the most seasoned of battlefront veterans. Try to see which characters you can and can't win with on each difficulty level using various tactics.
As of version 1.1, both SinglePlayer and MultiPlayer are functional. SP is supported for both Eras but intended for use with Galactic Civil War. MP is supported for Clone Wars only and has certain features disabled such as the AutoTurret, Hummer, and Tank. There are also more sound bugs, less visible zombie models, occasional CP ownership and spawn path glitches, but it is very fun to play with friends in a server and test your team skill. A patch to the mod limitations can only be developed if someone discovers a way to hack memorypools or the SWBF1 Source Code is released for modders.
Included Features
- AI on your team intelligently repair barricades and defend the house in other ways depending on UnitType designation.
- A wide variety of amazing player/weapon models, skins, and other contributions by many of the top modders on SWBFGamers.
- A military turret-mounted hummer with low fuel drain, it dies within 5 minutes and doesn't respawn.
- Combat 15 unique types of zombies and overpowered military soldiers in an epic struggle to survive against all odds.
- Sofas and Chairs let you jump over crates and serve as defensive support for barricades. Hordes of zombies can also be jumped on for an even riskier escape.
- Differing rates of damage for melee weapons. Zombies have 3 speeds for attack: Fast, Medium, and Slow. Player melee weapons rank in this order: Katana > Crowbar > Axe > Kitchen Knife > Baseball Bat
- The NOTLD Soundtrack features original film music in high quality, and radio news reporter stream samples which could not be incorporated into the map yet. The music is also public domain for distribution.
- First names have been synchronized with the AI to each unit. The last names are randomly generated numbers for now.
- SetDenseEnvironment is false for Hard and Medium, and true for Easy. This helps to smooth the difficulty level's transition balance, because by default, the game's difficulty gap is much bigger between Hard and Medium than between Medium and Easy. This is further improved by maximizing other difficulty options of Medium/Hard and minimizing them for Easy.
- The following hintnodes were placed strategically throughout the house: Mine, Sniper, Patrol, Cover, and Land (on the roof). Some are set as metanodes and some aren't.
- Boss Zombies always drop a dual ammunition pack on death. Brutes also drop single ammo packs sometimes.
- Minimap, Megamap, and Radar are forcibly disabled for the players by default. They can be toggled on by renaming "NoMap.lvl" to something else before map load.
- Powerful enemy AI on a difficulty scale never before seen in SWBF. Hard is basically impossible to win without using trainers.
- Included the mission LVL builder for players to customize their own difficulty setting preferences.
- Custom unit animation GAM bank can now be loaded by a Side.lvl instead of having to call on a custom Common.lvl. This uses the same zombie animation as polar express "wampa_sabre_stand_dashattack_full.msh"
Mod vs. Film
There are six main characters based on the 1968 and 1990 films NOTLD (original and remake). There are some alterations to the plot and storyline in this mod compared to the films:
- One of the key differences is that the characters are far more useful in this game than in the films. They have better weapons and more defensive capabilities. To counterbalance this, zombies run faster than in the films and are more diverse. Another difference is how extreme the zombie mutations are from the space probe radiation, resulting in even stronger ZEDs than normal.
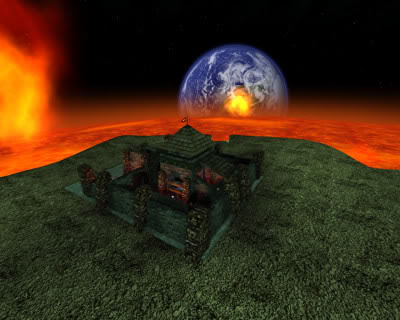
- The farmhouse is designed differently in the films than in this mod because of AI pathing limits. The design blueprint from the film was stretched out with a larger center added to contain the basement and upstairs rooms. In the NOTLD mod for NMRIH (no more room in hell), the farmhouse looks very similar to the films, because that game allows 3D map pathing for AI. The SWBF1 AI are limited to 2D Map Pathing in ZeroEditor, so adjustments had to be made, but most of the same props are featured and the house is very similar overall.
- Karen/Sarah is already deceased from the bite and is put down by Cooper after she attacks Helen and bites her on the neck. Helen survives is weakened as a result of the injury. As a result Helen is only armed with a Knife and Sledgehammer to mostly assist with repairing barricades until she dies.
- Other Deaths: Tom and Judy don't necessarily die from the truck exploding, although they can if you so choose. The deaths of each character vary each time, though it will usually be from zombies. You could even play with team damage on if you wanted for additional suspense/risk, or kill everyone and go on a suicide rampage with cooper, although it is highly recommended to play with Team Damage OFF or else the zombies will kill each other too frequently.
- Barricades are emphasized more here than in the film. They prevent the zombies from swarming in, allowing the team to pick them off safely through the windows or from the roof. Repairing barricades is essential to your team's survival. Once breached, it can become difficult to rebuild them in time. Zombies can get in through the windows and doorways unless they are repaired. All barricades may be repaired once destroyed, but Gun Cabinets cannot.
- Approximately half of the weapons featured were also used in the films - the other half are similar weapons added to increase the fun and strategic dynamic. Gun cabinets were added to each floor of the house to resupply ammunition.
- The military is hostile to your group of survivors. They don't mistake you for zombies as in the film. They are just as determined to kill you as the zombies, and are taking all firearms from exterminated civilian survivors. If you happen to survive the zombie waves long enough they will show up armed with deadly AK-47s, Grenade Launchers, M-40 Sniper Rifles, RPGs, and Flamethrowers, as well as a Mark VIII Tank and AH-6 Helicopter! There is no easy victory here. Tom may know how to drive a truck, but can he infiltrate enemy lines, steal and pilot a helicopter for the ultimate escape?
- The character Chief Sheriff McClellan and local police/militia were already overrun by zombies. The national guard has been sent to kill anything that moves in certain sectors deemed as uninhabitable quarantine zones. Other bosses featured are the Funeral Director (portrayed by Bill Hinzman) and Johnny (Barbara's deceased brother).
- There is no ladder in the film either, but I added one to climb on the roof. It works like a turret jump, enter and then exit.
Bugs
- Hardcoded soundpool limit of 32, and the map tries to load 48, which means one third of the map's audio is missing. The Hummer engine sound and other effects are missing.
- Multiplayer crashes because of certain map elements and the autoturret, a patch is being investigated
- Truck does not take damage from crashing into zombies, as a result it was slowed down so that it can't run over zombies.
- Wierd glitch of blood when shooting propane bombs, the game places Mines and Units to both fall under the ImpactEffectSoft property, can't fix this bug.
- Ben will sometimes spawn twice later in the battle, this is due to LUA hardcode settings that cannot be changed without the game source, or making it so that AI Ben doesn't spawn at all.
- Flamethrower will often push dead corpses around the map, not sure why.
- Various MP bugs such as missing sounds, models, and occasional CP ownership/spawn path glitches
Broken/Disabled Features
- Stationary rotating heads in the aquarium that turn to look at players, crashed the game.
- The mp3 for "White Zombie - Cosmic Monsters Inc." could not be included in the soundtrack because of copyright, it also uses speech samples from the film.
- Wavespawn prototype only works for the Military (delays their spawn by 20 minutes). It cannot be ported to zombies at this time due to classlabel and zeroeditor restrictions, a 10-wave spawn system prototype LUA is already scripted in case a workaround is discovered. Basically you cannot have respawning vehicles that use VehicleSpawn/VehiclePad classlabel from the WLD for any local teams, only the first 2 teams.
Possible Ideas For Future Updates
- More house prop models
- First Person melee views
- Destructible walls
- Hammer and nails replace fusion cutter repair sound
- Bloaters drop a green slime puddle when they die that kills anyone who walks over it
- Fish/Water in aquarium
- Add more custom weapon HUD icons, only some were added.
- Bigger terrain for longer zombie travel times
- A hack or trainer to disable AI Entity Suicide after 10 minutes spawned
- Separate localization for each zombie type (would require several sides and more LUA faction limit testing)
- TV Sound Effect and ingame Music and more custom weapon sounds
- Ghostcam or disabled spawn menu models mod for freecam view
- Increase sound memorypool limit add engine sound for all vehicles
- Stationary Karen local who spawns in basement and bleeds to death and can deploy a remote ODF, which functions similar to FreeCam. Description: "Karen is in a catatonic twilight state between human and zombie unconciousness and therefore cannot move. Her only weapon is Warg Sight, the ability to see outside of normal body view without moving. Once deployed, this has an infinite lifespan until Karen dies." This may also be given to Barbara as a 5th weapon "In SinglePlayer, she has an additional weapon/psychic power called "Warg Sight" from which she can remotely view the forest outside of the house from the perspective of a bird for a brief period of time, with a long recovery rate."
- New types of zombies and Alien bonus waves for an even greater challenge online
- New types of barricades and fifth weapons for SinglePlayer Era
- Add Unit 33 military voiceovers
- add graveyard and hill outside of map
- add dead karen as weak boss zombie spawn in basement at start
- add marauder zombie
- add radioactive green glow to the bloater using this tutorial http://www.swbfgamers.com/index.php?action=printpage;topic=4785
- test merging HarKal terrain
Sequel/Updates
As a fan of Romero's films, I plan on also making an epic mod map based on Dawn Of The Dead (1978 original not the remake) which feature the characters Roger, Peter, Stephen, and Francine. This will require some various shopping mall model props (and a harley davidson motorcycle msh) to be built in XSI, so if any modelers wish to help with this sequel map project let me know. George Lucas + George Romero = Win.
Check the official NOTLD thread on SWBFGamers for any future updates to this mod project or its documentation. Also submit feedback and any credit corrections here. Now that MP has been implemented, no major patches are planned, however the development patches website will continue to be updated sporadically. A potential Christmas/Winter Reskin and the sequel map project Dawn Of The Dead are TBA, and the DAWN map would require more modellers.
http://nld.fcsite.cf/ - This website contains links to all the NOTLD threads on SWBFGamers, downloads, recent news and project updates. It also shows server stats for the NOTLD server.
NOTLD v1.1 Credits
ZC Dev Team
Phobos - Design Document, Localization, LUA Scripts, Map Design, Side ODFs, Sound, and Strategy Guide
Sereja - Sound, Assets, and Tutorials
Tirpider - Assets and Tools
RepublicCommando - Assets
Unit 33 - Assets
Unit Models
Ben - Tirpider, Unit 33, and Phobos
Barbara - Sereja and Tirpider
Tom - Unit 33
Judy - Tirpider and RepublicCommando
Cooper - Unit 33 and Tirpider
Helen - Sereja
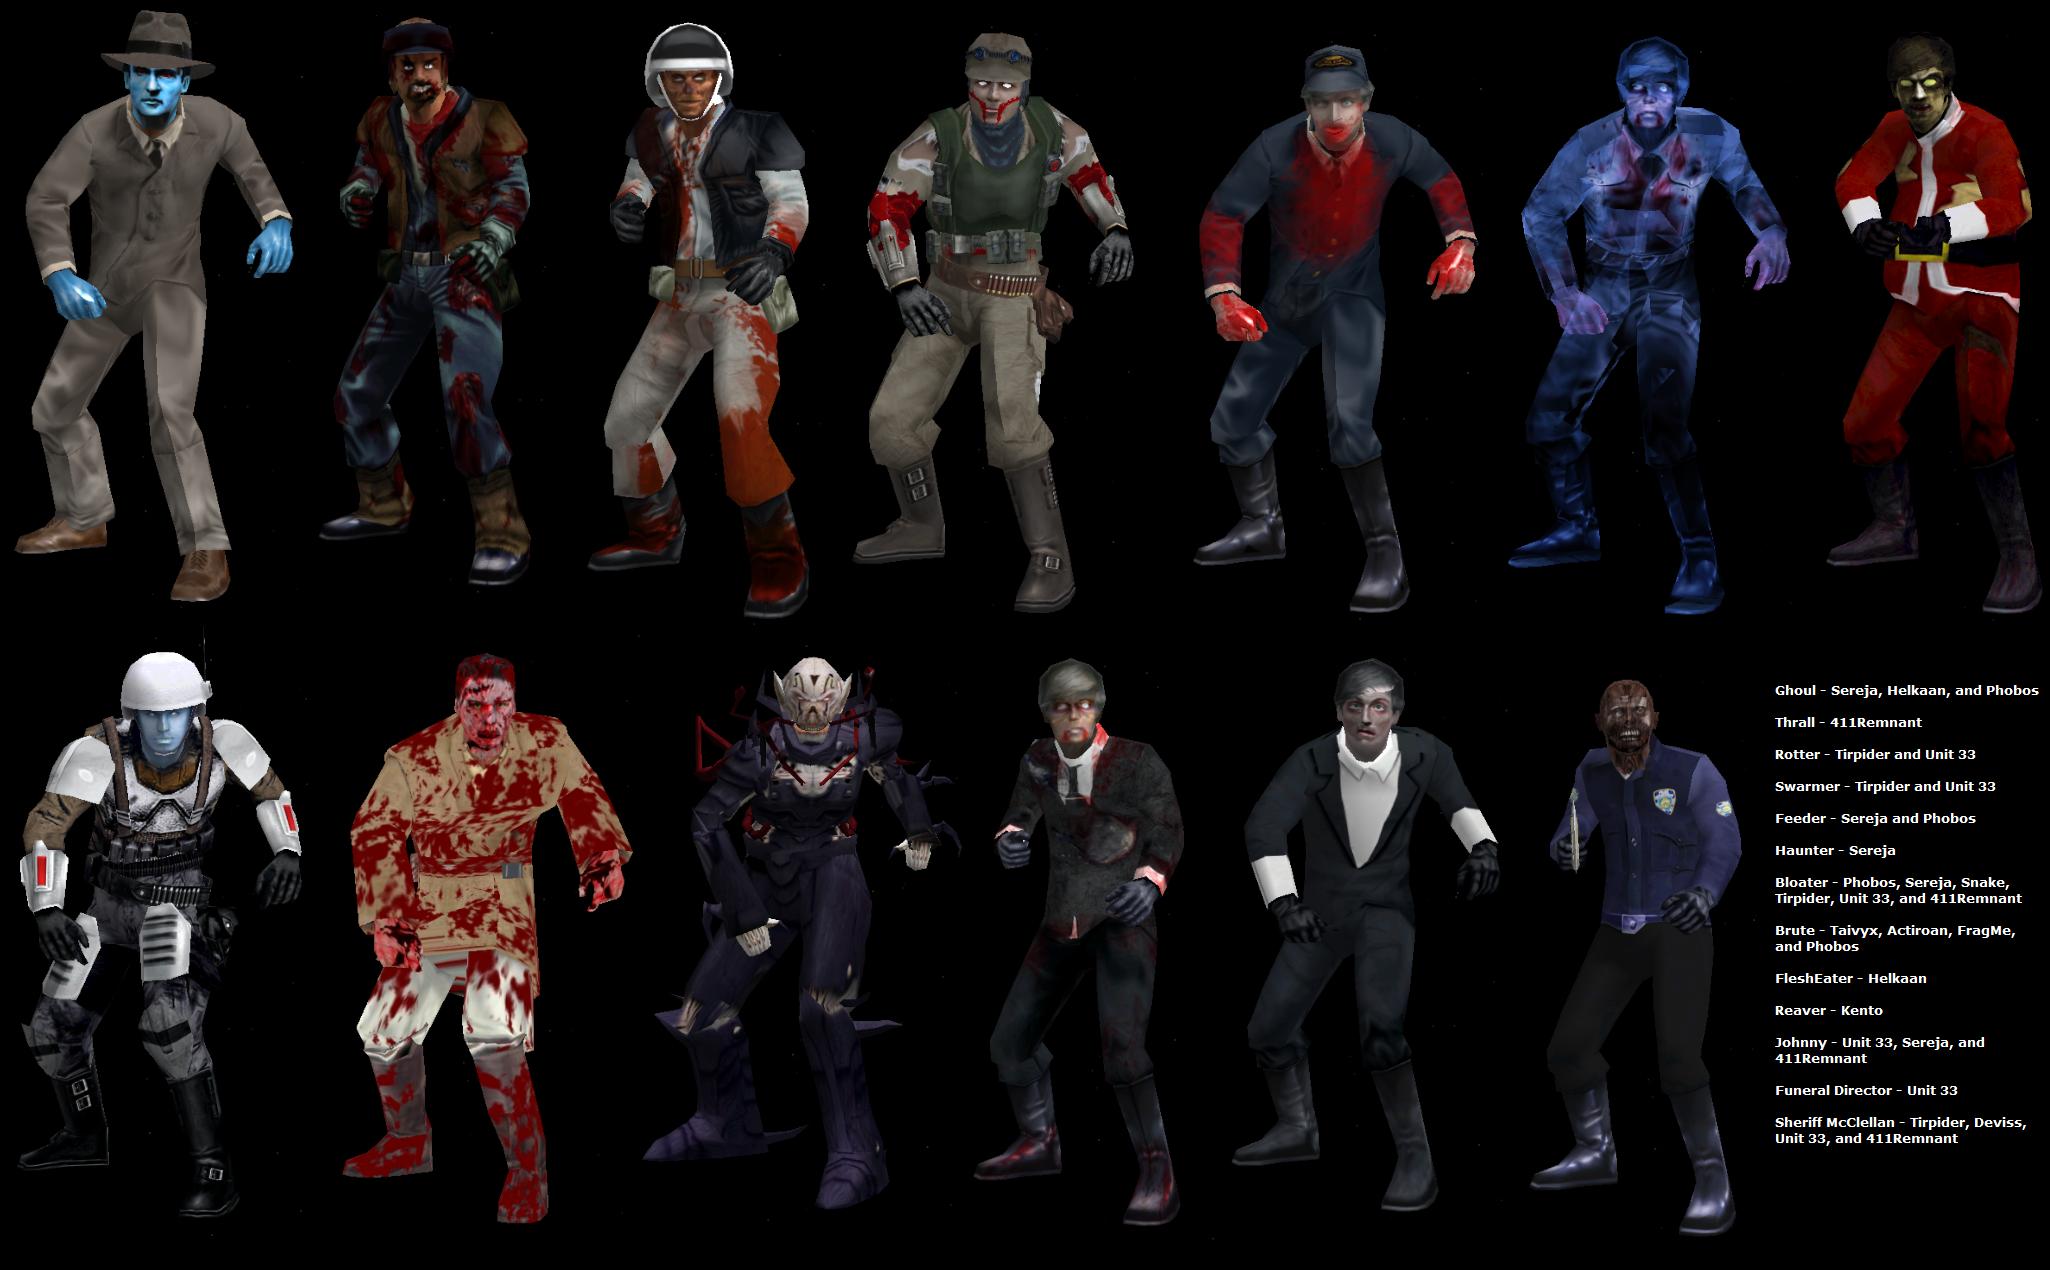
Ghoul - Sereja, Helkaan, and Phobos
Thrall - 411Remnant
Rotter - Tirpider and Unit 33
Swarmer - Tirpider and Unit 33
Feeder - Sereja and Phobos
Haunter - Sereja
Bloater - Phobos, Sereja, Snake, Tirpider, Unit 33, and 411Remnant
Brute - Taivyx, Actiroan, FragMe, and Phobos
FleshEater - Helkaan
Reaver - Kento
Witch - Sereja and Phobos
Hellspawn - Mandarek and Phobos
Johnny - Unit 33, Sereja, and 411Remnant
Funeral Director - Unit 33
Sheriff McClellan - Tirpider, Deviss, Unit 33, and 411Remnant
Warlock - Tirpider
Military Soldier - B.I.G Cookie and Unit 33
Military Vanguard - B.I.G Cookie and Unit 33
Military Grenader - Sereja
Military Assassin - MileHighGuy
Military Pyro - Unit 33 and Tirpider
Weapon Models
Hammer - Sereja
Sledgehammer - Sereja
Bladed Brass Knuckle - Wazmol
Knife - Sereja
Baseball Bat - RepublicCommando
Crowbar - Tirpider and Milanbon
Axe - Pandemic
Katana - RepublicCommando
9mm Handgun - Taivyx
Smith & Wesson Revolver - Sereja
Colt Revolver - RepublicCommando
Longbow, Arrow, and Quiver - Sereja
Tommy Gun - Sereja
Flintlock Rifle - MileHighGuy & Llew
Remington Shotgun - Taivyx
Molotov Cocktails - RepublicCommando
Propane Proximity Bombs - RepublicCommando
Deployable AutoTurret - Pandemic
AK-47 - Taivyx
MultiMortar Launcher - Wazmol
Flamethrower and Tank - Sereja
M-67 Hand Grenade - Sereja
RPG & Warhead - Taivyx
M40 Sniper Rifle - Taivyx
Magic Staff - Unknown
Glaive - Unknown
Vehicle Models
Turret Hummer - RepublicCommando & Sereja
AH-6 Helicopter - Nikoli
Mark VIII Tank - Sereja
Map Models/Textures
Several Prop Models - Eddie/Squeddie & Caleb1117
Wooden Board - Sereja
Crate - RepublicCommando
Bathtub - RepublicCommando
Palm Tree - RepublicCommando
Telephone Pole/Wire - RepublicCommando
Roadblock - Eddie
Sofa - Eddie
Table - Eddie
Gun Cabinet - Sereja
Rifle Prop - Andeweget
Fridge Texture - Phobos
Basement Floor Texture - Cisticola
Hookah with Smoke - Darth SpiderPig
Sky Comet and Plasma Effects - Sereja
Misc
SchMEe - Tirpider
Deployable AutoTurret Assets - MileHighGuy
Yoda Animation Munger Tool - MileHighGuy
BF2 To BF1 Unit Animation Conversion Tutorial - Sereja
Flamethrower and Fire Effects - Sereja
Blood Effects - Sereja
Toxic Gas Effects - Sereja
Various Weapon Icon Textures - Sereja
Zombie Explosion Chunks - Sereja & Tirpider
Hologram Tutorial - Bamdur
Sound Effects
Zombie Groans and Sounds - Sereja
Human Tactical Voiceovers - Sereja
Soundtrack
George Hormel - Mysterioso 1
George Hormel - Mysterioso 2
Ib Glindemann - Curious Danger
Ib Glindemann - Storm Attack At The Window
Night Of The Living Dead Theme
Spencer Moore - Eerie Heavy Echo
Spencer Moore - Night Of Anubis
Stan Livingston - Space Eerie Gliss
Thrall Sounds - The Walking Dead
William Loose & Jack Cookerly - Fire
William Loose & Jack Cookerly - Night Suspense
William Loose & John Seely - Black Night
William Loose & John Seely - The Monster Walks
Zombie Radio - Night Of The Living Dead
Inspiration
- George Romero
- George Lucas
*If there is any mistakes or missing credits please post in the NOTLD thread on SWBFGamers.com and it will be corrected in the Extended Credits section.
NOTLD Strategy Guide
General Combat Tips
Melee Tactics - Barbara, Ben, and Tom are best at melee because of their faster swingspeed. Melee is the most important weapon you have because it never runs out of ammo. Use this in conjunction with other weapons to maximize DPS. Weapons which stun the enemy are particularly useful for getting in a few extra swipes while they're on the ground.
Barricades - Helen, Judy, and Ben have the sledgehammers and are most effective at repairing barricades and should focus on them most often. Barbara, Tom, and Cooper should provide firepower support and only repair when needed or not being attacked.
Surviving The Military - Lure the tank near the Gas Pump propane tanks and destroy them with a powerful weapon. The explosion will be significant enough to destroy the tank. Cooper can also try destroying it with miniature propane tanks but this is much more difficult and he will likely need cover fire from Tom and Ben to succeed.
Other Tips - It is advised not to construct the basement door barricades until the main floor is overrun and no longer defensible. Those who make it to the basement in time will need to focus all effort on defending the chokepoint for once this last .defensive measure falls, good luck getting out. The alternative strategy is to run upstairs, as you can escape through these windows outside, but there are many zombies waiting out there also.
- You can trap AI in the basement by telling them to stay there and then barricading them in. The AI will not move or repair any barricades if told to Hold Position. If told to Follow Me then up to two will follow you while the rest disperse. If told to spread out, the AI will function again as they did when first spawning. Commanding your friendly AI is an important strategy in this map.
Characters
One of each character spawns by default, excluding the player, so your team should have 7 units in total. You will need to strategically position some of the AI (example: tell Judy to follow you to the door then hold position so she will constantly repair it). Each character has an automated role to perform in the absence of the player, though you might have to maneuver them in place. Hintnodes were utilized to assist Cooper with throwing molotovs out the window on his own. The pathing and boundary features in ZeroEditor were refined to make the AI more familiar with the surrounding environment than they are on most maps.
Ben - Ben is the group leader/hero. He is the strongest, most fearless, and is quite skilled with firearms and melee combat. He is the main muscle used to outsmart and combat the zombie forces. Armed with a flintlock rifle, colt revolver, crowbar, and a sledgehammer for repairing barricades.
Barbara - Barbara is the team assassin - the quickest, most agile member of the group. She is moderately skilled at combat, and is considered second in command. She is based more on the Barbara from NOTLD 1990 remake, not the original 1968 film. Armed with a tommy gun, revolver, katana, and a hammer.
Tom - Tom is the team's mechanic/shotgun specialist, he has the strongest firearms but is slower at melee combat. He is the group member tasked with driving the truck*, which can be used as a weapon against the zombies until it's destroyed. Armed with a remington shotgun, 9mm handgun, axe, and a hammer.
*Tom has 'classlabel pilot' bonus for slowly autohealing any vehicle he drives. Therefore the truck's offensive ability will last longest when Tom is the one driving it. However, vehicles in this mod have limited fuel and are destroyed after a certain amount of time - use them wisely.
Judy - Judy is the team's carpenter and is considered a weaker member of the group due to her limited combat abilities. However, she is also able to repair barricades 2x faster than Barbara, Tom, or Cooper, giving her a defensive advantage as an AI. Armed with a longbow, knife, sledgehammer, and autoturret(SP)/hammer(MP).
Cooper - Cooper is the pyro/troublemaker and usually disobeys Ben, causing conflict within the group. Cooper is very drunk so his coordination will be slower than others. His most useful attribute is hurling molotov cocktails out the window at zombies and watching them burn, much to his amusement. Armed with a molotov cocktails, propane proximity bombs, baseball bat, and a hammer.
Helen (NPC) - The wife of Harry Cooper, Helen is very distraught at the death of her daughter and subsequent zombification. She too has been bit and knows it is only a matter of time before she dies. Helen is the weakest member of the group and is barely capable of fighting, although she can still repair barricades to assist the group's defense efforts until her inevitable demise. Armed with nothing other than a knife and sledgehammer.
Character Strategy
- Ben is most useful during early waves when placed on the roof upstairs, where he can snipe enemies from any distance. Using the ladder to reach this place is a must once the upstairs crate is repaired. AI not snipe as far as players and don't provide much cover fire. AI will also not target the most dangerous enemies first, such as bloaters. Ben is considered one of the strongest units for surviving after the military spawns, because of his distance advantage. It is advised to make sure that AI Ben stays on the ground floor to help repair barricades due to his sledgehammer repair speed bonus. AI Ben can also get kills up close with the sniper rifle through the windows, although he lacks the selective targeting advantage a human player has. There are a few positional sniper hintnodes placed on the map for each floor for Ben to help defend chokepoints.
- Barbara is most useful outside initially, staying close to the house and disposing of any flankers or other threats. Later on she should be placed upstairs on the balcony to provide cover fire, as she can get more headshots with the height advantage. However she may also need to be relocated downstairs to help repair barricades later on, and defend the doorway once breached. She is the most dynamic survivor on the team and can be used in flanking missions due to her heightened reflexes.
- Tom is most useful at defending the house from any perimeter breaches, especially chokepoints such as the upstairs and basement. Having him camp with Judy at the front of the house or in the center hallway will provide assistance for repairing barricades, and the shotgun will not only push zombies back but deal considerable splash damage to multiple zombies. The only drawback is a bit slower reload time than other units, but this is not a huge disadvantage. Tom can drive the hummer or park it somewhere around/inside the house as an extra defensive barricade, although it will run out of fuel and explode within 5 minutes.
- Judy should be placed in a defensive location, wherever most zombies will be concentrated on attacking barricades. She should repair barricades surrounding this area as much as possible due to her sledgehammer repair speed bonus. Judy will also use her explosive longbow to shoot through barricaded windows at the incoming zombies. The stun from this weapon helps keep crowds under control a bit, however this character is considered to be the weakest both in the film and mod. When the defences are breached, Judy will die faster than others, so make sure to keep her away from the frontlines. The AutoTurret is a useful weapon added to make this character more interesting. Place it in a strategic location and watch it decimate enemies. Make sure you go PRONE before deploying the turret and aim it just right to get a consistent headshot-level stream of automated firepower. For MP servers, Judy should use the SledgeHammer to constantly repair barricades, and briefly switch to Hammer when it is overheated for continous repair.
- Cooper should camp somewhere safe due to his extremely slow speed so as to not get overrun. Due to good placement of Patrol and Cover Hintnodes, AI Cooper will accurately throw molotov cocktails through windows and over barricades at incoming swarms of zombies, the radius of fire damage is strong enough to kill multiple zombies with consistency. The propane bombs are slower to deploy, but deal even more powerful damage. Place them in very important locations such as chokepoints and large barricades. Hintnodes for landmines were also added to maximize AI Cooper's defensive abilities. Cooper is perhaps the most dynamic character on the team, but is highly vulnerable when surrounded by zombies with no escape route in sight.
- Helen cannot be controlled due to being an NPC. The native spawnpath is placed in the basement so that Helen will repair barricades and kill some zombies with a knife until her untimely death. Helen should be protected by players from zombies due to her lack of firearms.
Zombies
Ghouls are the weakest and most basic zombies. They are not much of a threat and easily disposed of.
Thralls are slow, shambling corpses which are waterlogged. They have higher health and spawn on the first wave. They groan very loudly and are easy to detect. Their only real threat is when you are cornered and outnumbered by them.
Rotters are slow, stupid zombies, but have high health and a raspy, ghastly groan due to extreme decay of their lungs and vocal chords.
Swarmers are moderate speed howling zombies, faster than the slow zombies. They have above average health and spawn on wave 4. They love to attack humans in swarms - hence the name.
Feeders are slightly faster and stronger than Swarmers. Feeders enjoy ravenously feasting on the entrails of live human prey - do not hesitate to put them down or you will become zombie lunch.
Haunters are faster speed zombies with lower health. They are the only zombies which are completely silent, a Haunter can easily sneak up on and kill someone who is not paying attention.
Bloaters are obese, bloated zombies full of corrosive toxic gas which deals high damage to players and barricades. They will exhale poisonous gas around players, causing considerable damage and they should be destroyed from a distance. Bloaters are the slowest zombie with very high health, and they usually explode on death.
Brutes are armoured military zombies, and are quite strong because of powerful healing bodyarmor which most other zombies lack. Their base health is low enough that you should try to kill them as soon as possible. They heal quickly so they must be killed quickly; in large groups they are virtually unstoppable.
FleshEaters are extremely aggressive zombies, like Feeders on steroids. They have high health but slower healing rates compared to Brutes. FleshEaters are faster than most players except Barbara, and they can dodge shots more than most zombies, so they should be killed immediately.
Reavers are vile creatures who appear to have spawned from the fiery depths of Hell. Those fortunate enough to survive an encounter against the ungodly Reavers might still be haunted by nightmares of their bloodthirsty, soul-piercing screams. Reavers are the strongest and fastest zombies you will encounter apart from the minibosses.
Witches are dangerous foes who have high health and run very fast, they also have a special weapon called Telekinesis which stuns all players and zombies within the push radius. They also have a lightning bolt weapon, a powerful magic staff for melee, and the ability to jump.
Hellspawns are undying abysmal demons summoned directly from Hell. They are extremely powerful zombies with higher health than Bloaters, but are the same speed as FleshEaters. Their glaives are the second fastest zombie melee weapon, and they also have the ability to jump.
Johnny is the weakest of the three zombie bosses, he is the zombified brother of Barbara. Johnny has higher health than most zombies but has no healing, and he is capable of decimating your whole team if left unchecked.
Funeral Director is the 2nd strongest zombie to spawn, and is based on the very first classic zombie actor ever captured on film, none other than the legendendary Bill Hinzman. He has twice as much health as Johnny, has a basic healing rate, moves faster, and laughs sadistically while slaughtering your comrades.
Sheriff McClellan is the strongest zombie in NOTLD, and he is armed with the fastest melee weapon in the game: a bladed brass knuckle which can deal 5K DPS. He also has an explosive energy ball that deals very high damage. The Sheriff has four times as much health as Johnny, moves faster than all zombies, and heals twice as fast as the Funeral Director. He is determined to butcher every single human he encounters - it will require considerable firepower and teamwork to bring down.
Warlocks are unseen enemy units needed to delay the spawn time of Military Units (this wavespawn method does not work on local zombie factions unfortunately). Their black magick voodoo rituals are initially what summons the dead, although the media claims it is radiation from an outer space probe. They do not fight players and will die shortly after the round starts.
AI Classlabel Intelligence
- Assault units will not strafe as the others and charge at players directly, making them easier to shoot. It is also used to encourage AI to use explosive weapons and Landmine Hintnodes.
- Trooper units strafe considerably at close range and attempt to dodge shots at longer range, making them more difficult to hit.
- Pilot classlabel is used to make AI repair barricades more often and otherwise functions as Trooper.
- Scout classlabel is for AI to use Sniper Hintnodes and otherwise functions as Trooper.
Zombie Stats v1.1
Ghoul - Acc 55, Run 4.5, Strafe 4.5, HP 1500, Assault
Thrall - Acc 55, Run 4.0, Strafe 3.0, HP 2250, Assault
Rotter - Acc 55, Run 3.5, Strafe 3.0, HP 3000, Assault
Swarmer - Acc 70, Run 5.0, Strafe 4.5, HP 2500, Assault
Feeder - Acc 70, Run 5.5, Strafe 4.5, HP 2750 +50, Assault
Haunter - Acc 70, Run 7.0, Strafe 4.5, HP 2000 +200, Trooper
Bloater - Acc 35, Run 3.0, Strafe 1.5, Turn 1.0, HP 9000 +90, Assault
Brute - Acc 70, Run 5.0, Strafe 4.5, HP 5000 +1000, Assault
FleshEater - Acc 70, Run 5.5, Strafe 4.5, HP 5500 +220, Trooper
Reaver - Acc 70, Run 7.0, Strafe 6.0, HP 6500 +110, Trooper
Witch - Acc 70, Run 6.0, Strafe 4.5, HP 5000 +500, Trooper
Hellspawn - Acc 70, Run 6.5, Strafe 4.5, HP 10000 +250, Trooper
Johnny - Acc 70, Run 6.5, Strafe 4.5, HP 20K/40K/80K, Assault
Funeral Director - Acc 70, Run 7.5, Strafe 4.5, HP 40K/80K/160K +20/40/80, Trooper
Sheriff McClellan - Acc 70, Run 8.0, Strafe 6.0, HP 80K/160K/320K +40/80/160, Trooper
Warlock - Acc 0, Run 0.0, Strafe 0.0, Turn 4.0, HP 1,000,000 -100,000, Trooper
Character Stats v1.1
Ben - Acc 70, Run 7.0, Strafe 4.5, HP 10125 +675, Scout
Barbara - Acc 70, Run 8.0, Strafe 6.0, HP 8625 +575, Pilot
Tom - Acc 70, Run 6.0, Strafe 4.5, HP 9225 +615, Pilot
Judy - Acc 70, Run 7.0, Strafe 4.5, HP 7125 +475, Pilot
Cooper - Acc 70, Run 5.0, Strafe 3.0, HP 8250 +550, Assault
Helen - Acc 70, Run 6.0, Strafe 4.5, HP 7500 +500, Pilot
Military Stats v1.1
All Military Units - Acc 70, Run 8.0, Strafe 6.0, HP 6,000 +150
Grenader - Pilot
Pyro - Pilot
Sniper - Scout
Trooper - Trooper
Vanguard - Assault
*Turn Speed is 2.0 for Cooper and Bloater, and 4.0 for everyone else.
Weapons & Tools
Hammer - A replacement for the fusion cutter, used to repair barricades.
Sledgehammer - Twice as fast at repairing barricades than the hammer.
Baseball Bat - A melee weapon used by Cooper, swing speed 1.0
Kitchen Knife - A basic melee weapon used by Judy and Helen, swing speed 0.9
Axe - A melee weapon used by Tom, swing speed 0.8
Crowbar - A melee weapon used by Ben, swing speed 0.65
Katana - A melee weapon used by Barbara, swing speed 0.5
9mm Handgun - A backup weapon used by Tom in case of shotgun jam to help put down walkers, it deals less damage than the other firearms but has a quicker reload rate and high ammunition clips.
Revolver - A secondary weapon used by Barbara, it deals more damage per shot than the Tommy Gun but has a slower rate of fire and reload rate. It is useful in a pinch or versus powerful zombies.
Colt Revolver - A slow but powerful revolver used by Ben as a backup at close range combat, it deals slightly more damage and has a faster shot velocity than the standard Revolver.
Explosive Longbow - A decent medium range weapon used by Judy to stun and slay zombies defensively without running out of ammo too quickly. Always aim for the head or charge up shots to maximize kills.
Tommy Gun - The fastest rate of fire weapon your team has is most useful at short range. Barbara can line up multiple headshots with this weapon to quickly tear hordes to shreds. This is more of an offensive than defensive weapon, and it burns through ammunition rather quickly so be conservative.
Flintlock Rifle - The longest range weapon available, Ben uses this to kill enemies from a distance. As such it is essential Ben has a tactically superior position, preferably on the roof to kill the highest threats first. Headshots from this deal massive damage.
Remington Shotgun - The strongest firearm your team has is used by Tom and features high damage spread along with a push effect. This is extremely useful for fighting the Funeral Director, Bloaters, and keeping other intruders from breaching the door. Remington is the ultimate defensive firearm for close quarters combat.
Molotov Cocktails - The standard crowd-control weapon of choice for an alcoholic redneck surviving the zombie apocalypse. If Cooper isn't drinking it, he's lighting it on fire and throwing it at zombies.
Propane Proximity Mines - The strongest weapons your team has at their disposal, Cooper places these in strategically important locations to maximize their advantage.
Deployable AutoTurret - Judy managed to steal one of these from the Military earlier, when Tom stole their Hummer. Highly invaluable when placed in the proper location, can provide a powerful stream of defensive cover fire.
Warg Sight* - Remotely view the forest outside from the perspective of a bird for a limited time.
*Excluded
Enemy Weaponry
Zombie Melee - Zombie teeth and hands will be the main weapons used against your team. Never underestimate the power of a zombie. Some zombies attack slower than others, there are 3 speeds of zombie melee, Fast = 0.7, Medium = 0.9, Slow = 1.1
Bladed Brass Knuckle - A weapon used by the Sheriff which is twice as fast as the Katana, SwingSpeed = 0.25
Zombie Bile - Corrosively toxic gas contained in a Bloater Zombie will cause extreme health reduction to players and barricades, and has a large damage radius when they exhale.
AK-47 - The standard grunt units carry these as their main weapon, and smoke grenades as a backup. It has a faster rate of fire and reload speed than the Tommy Gun, and deals more damage.
M-40 Sniper Rifle - One hit kill from any range, Military Sniper Ninjas using these will lurk about in high camoflouge, and must be killed from a distance or avoided if possible.
Flamethrower - A very deadly stream of fire will incinerate anyone standing in the path. There is no defense from this other than to kill the units before they can reach you.
Grenade Launcher - A grenade has significant blast radius and can be thrown into the house through any opening in the window. Barricades don't last long against these and only provide an immediate defense at best. Each shot launches 4 grenades into a random spread pattern with only 3 seconds to escape, so when you see these move quickly!
RPG Missile Launcher - The handheld RPG missile is the same as the tank's, but soldiers take longer to reload than the tank does. The blast radius and damage from these is enormous. The rockets will lock on to players and vehicles using advanced heat-seaking technology which makes Military Vanguards an extremely high threat that must be disposed of at once.
Minigun Turrets - A constant stream of automatic .50 caliber automatic minigun turret fires from the Military Hummer. These bullets are very lethal and there is little to no defense from them, considering they deal splash damage and a much higher base damage per shot than the deployable autoturret your team has.
Helicopter Rockets - The main pilot and copilot rocket launchers are very devastating and highly lethal to anything in its path.
Barricades
The interior design of the farmhouse is much different than in the films due to the 2D AI pathing limitations of zeroeditor. As a result, the concept of structuring the map so that the house must be defended until help arrives was implemented, as well as the principles of defending a shrinking fortress, through extensive layering of various barricade models. Zombies will selectively target barricades and attack them as well as players. There are 6 types of barricades that can be used to defend your team from being overrun by zombies. Zombies will only attack barricades with melee directly when a player is close to them, otherwise they use the claw attack, which is weaker but has longer range, so the more zombies outside, the faster the barricades fall.
Wooden Board - HP 6000 - The weakest and most simple of barricades, several of these are used in combination to block zombies from entering windows.
Chair - HP 15,000 - These are used defensively to reinforce crates in the center hallway. Chairs can also be used as access points to jump over crates that are already constructed. Defending the center hallway is important so it's a good idea to repair these frequently.
Sofa - HP 20,000 - Sofas are used like Chairs to help reinforce and jump over crates in the hallway, and they block more zombies from passing by. These are quickly destroyed by zombies so be sure to repair them often.
Crate - HP 30,000 - A stronger, more durable defensive structure used to reinforce windows and doorways. Crates are extremely important to keep repaired as they block wider doorways which are usually targeted by the most zombies.
Roadblock - HP 60,000 - Even stronger than crates, your team only has two of these outside to provide a front shield defense in front of the main doorway crates. These should be constructed immediatly at the start of a round, since they are often impossible to repair later on.
Table - HP 90,000 - The most durable barricade your team has, solid oak slab tables function as doors, completely blocking off wherever they are placed. Unfortunately your team only has two of these, but one can be constructed to protect your team inside the basement if, provided you have enough defensive support.
Gun Cabinet - 75,000
Technically not a barricade, there are 3 of these used as ammunition sources located in the basement, upstairs, and ground level. These cannot be repaired once destroyed, but fortunately the zombies will not target them either. The military can easily destroy them however with explosives so make sure to stock up on ammo when you see them approaching.
Hummer - Health 75,000 -250
This one time defense can be parked temporarily as a barricade in front of or inside the house. It will sustain damage from bloaters and other collateral explosive damage for a few minutes until it's destroyed, so use it wisely.
Barbwire Fence - 200,000
The ultimate defensive barricade, it can only be constructed once in the basement for a "last stand" scenario. It is essential to keep this repaired at all times once built, but even this will fall quickly to the military's weapons. [/spoiler]


 [/spoiler]
 [/spoiler]


 [/spoiler]
